1. Operator Portal
Overview
The Operator Portal is where you can access and manage your me&u menu and settings, including:
- Building products and modifiers
- Editing menu layouts
- Adjusting service times
Products
How to create & manage products including:
a) Product Name
b) Type
c) Description
d) Image
e) Price
f) Product Code
g) Modifiers
h) Categories
i) Dietaries
j) Tags & Flags
2. Venue Manager
Overview
Venue Manager (VenMan) is where you manage in-service features. Such as:
- Disable me&u beacons
- Manage menu items that are sold out
- Manage customer expectations with wait times
- View total tips and sales for the day
- View live orders and order history
Disabling me&u
Click Launch Venue Manager and enter your PIN.
Disable a single beacon/table
- Go to Floor Manager.
- Open the section with the beacon you wish to manage.
- Select the Availability, and set the beacon as Available, or Unavailable and define a time expiry.
- Once confirmed, the beacon will be switched off for that period of time, and any active users will be kicked off it.
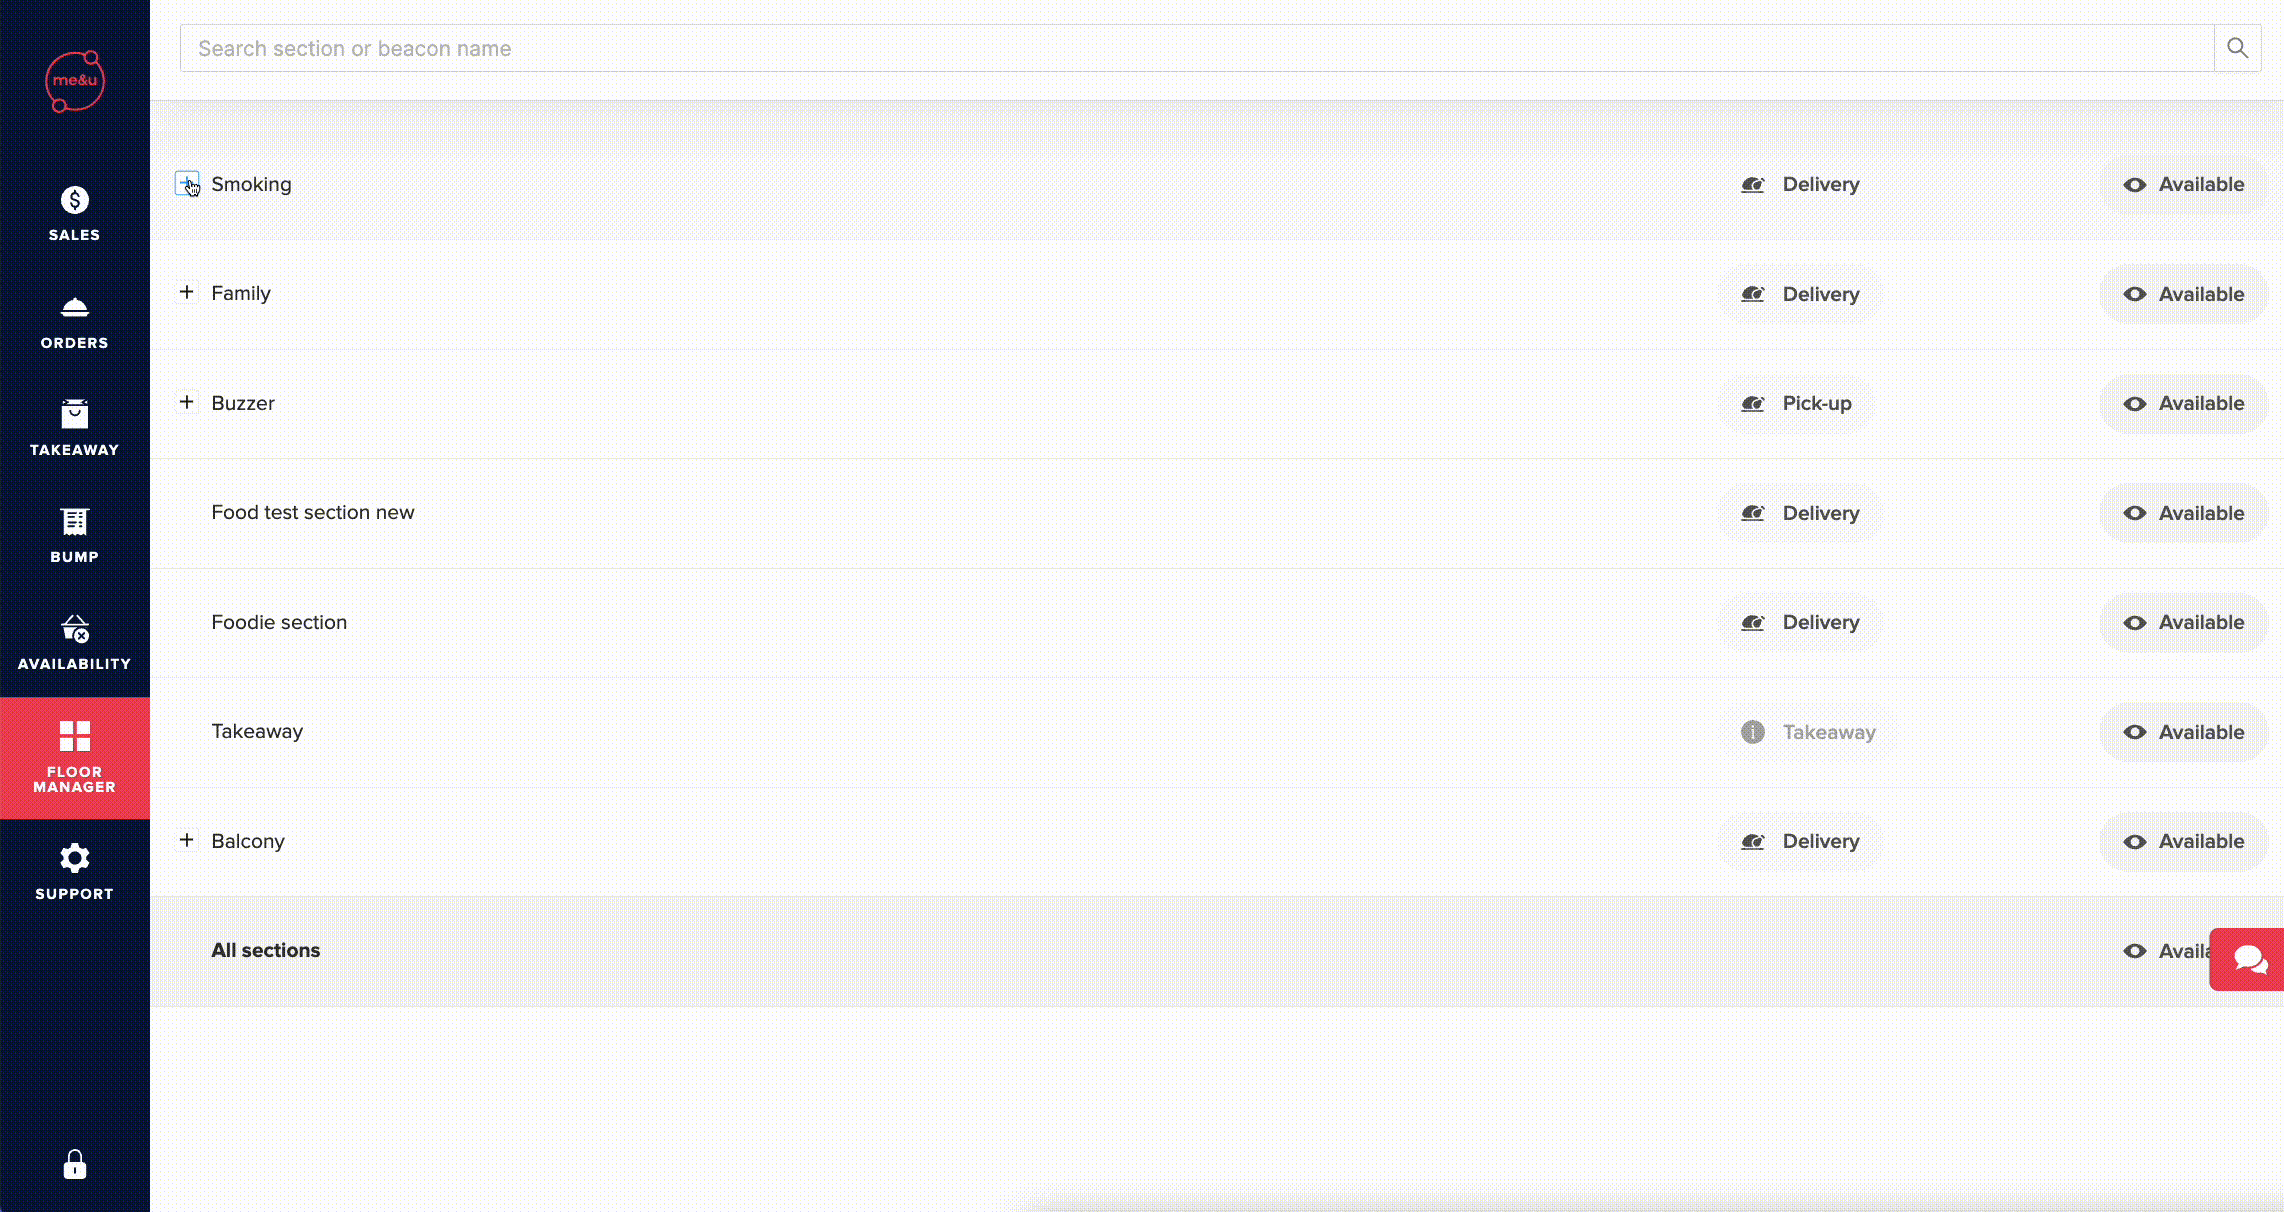
Disable a section
- Go to Floor Manager.
- If your venue has more than one section you can click on Available next to an individual section's name and only disable the one section.
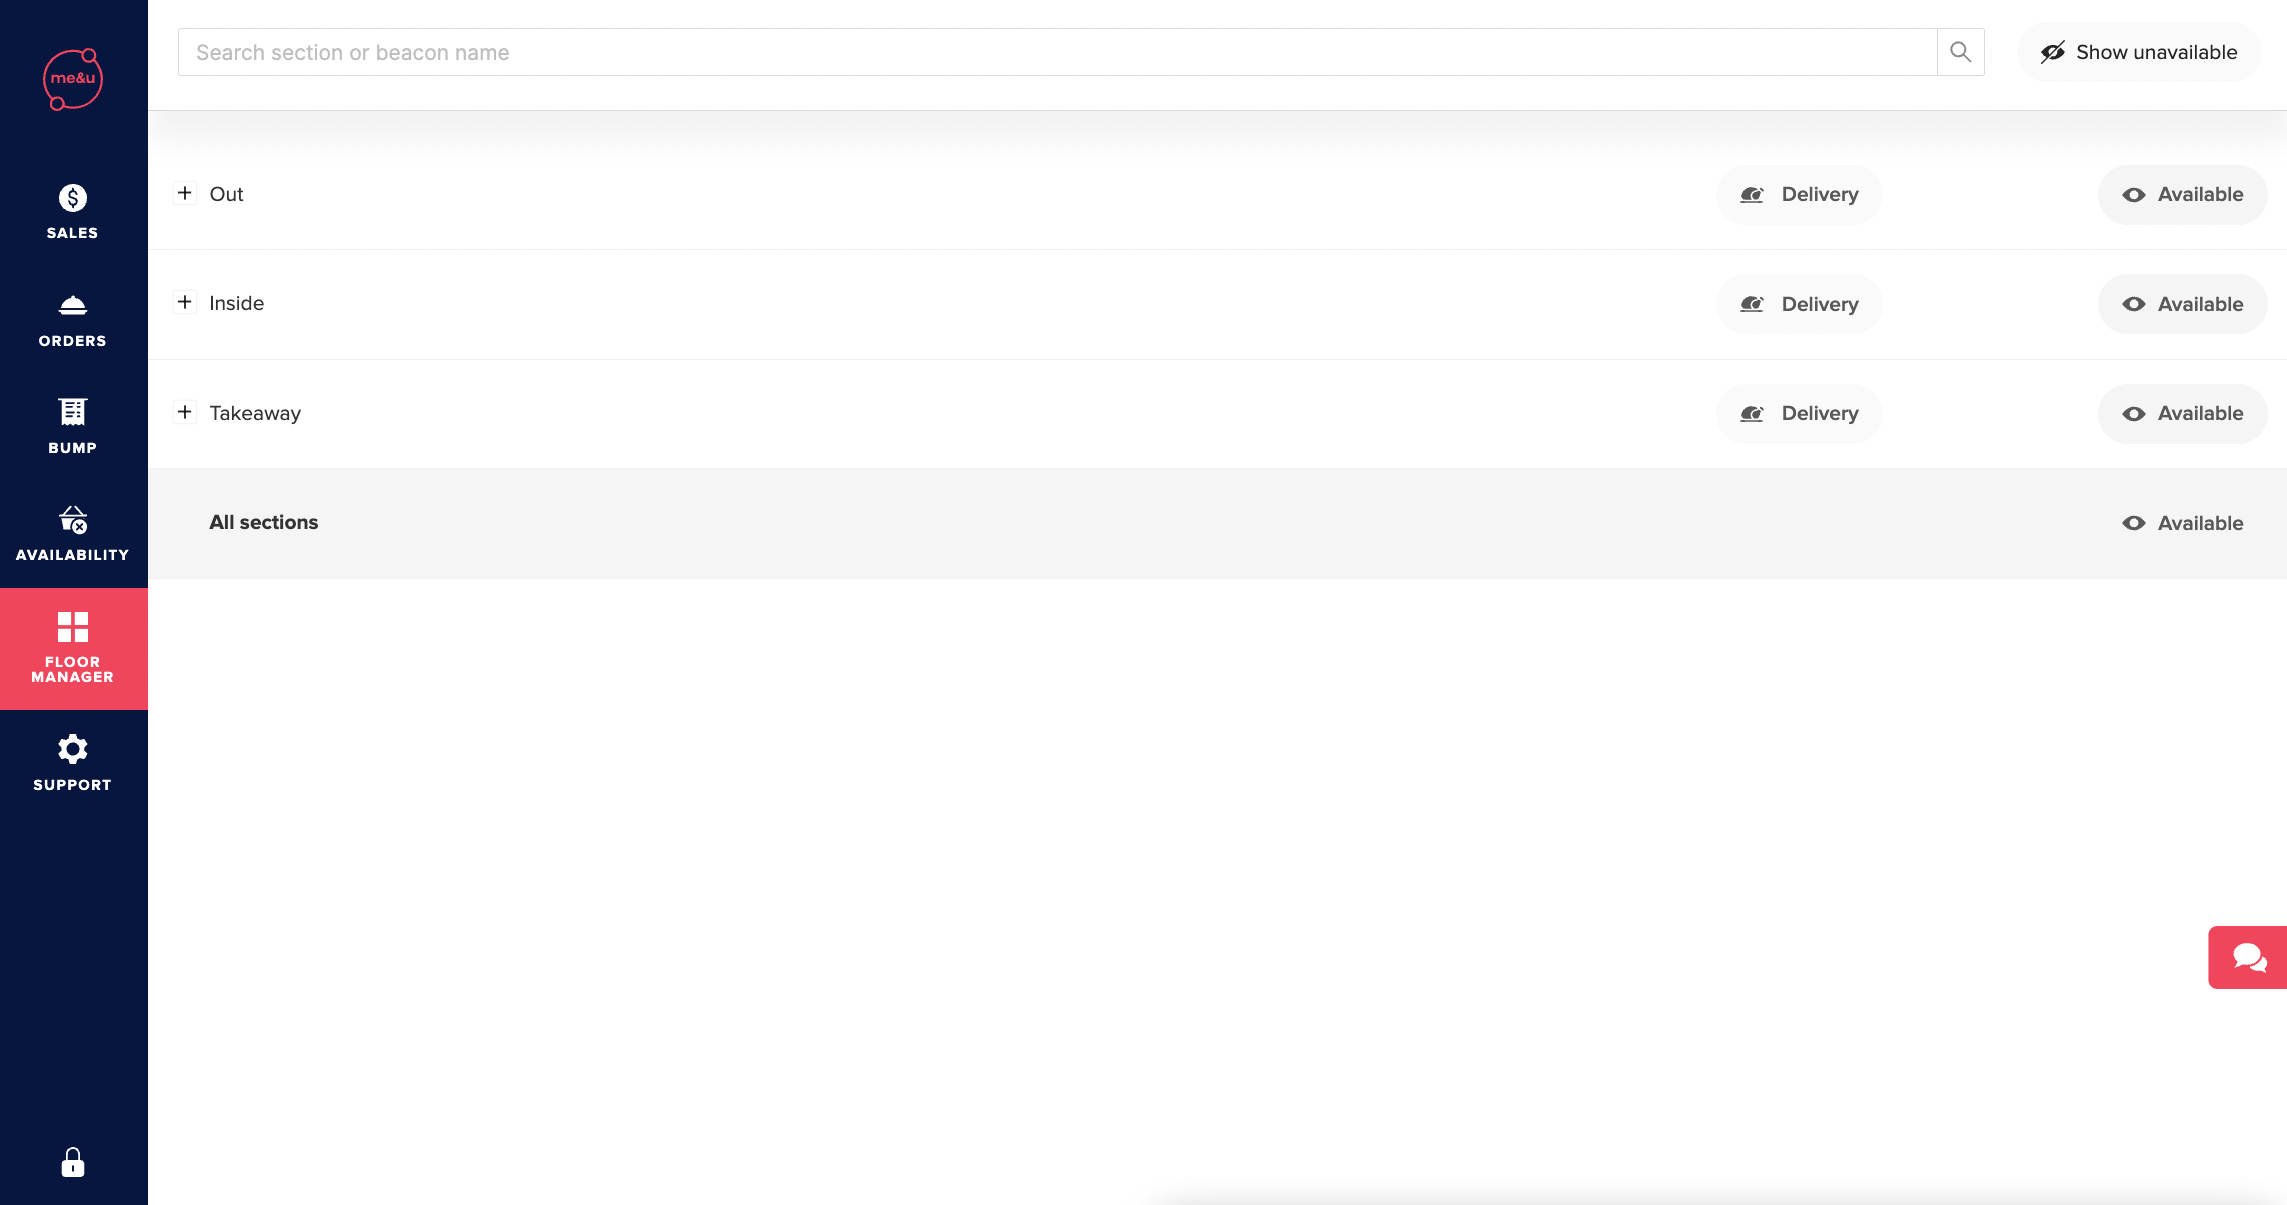
- Select the reason why you are disabling me&u
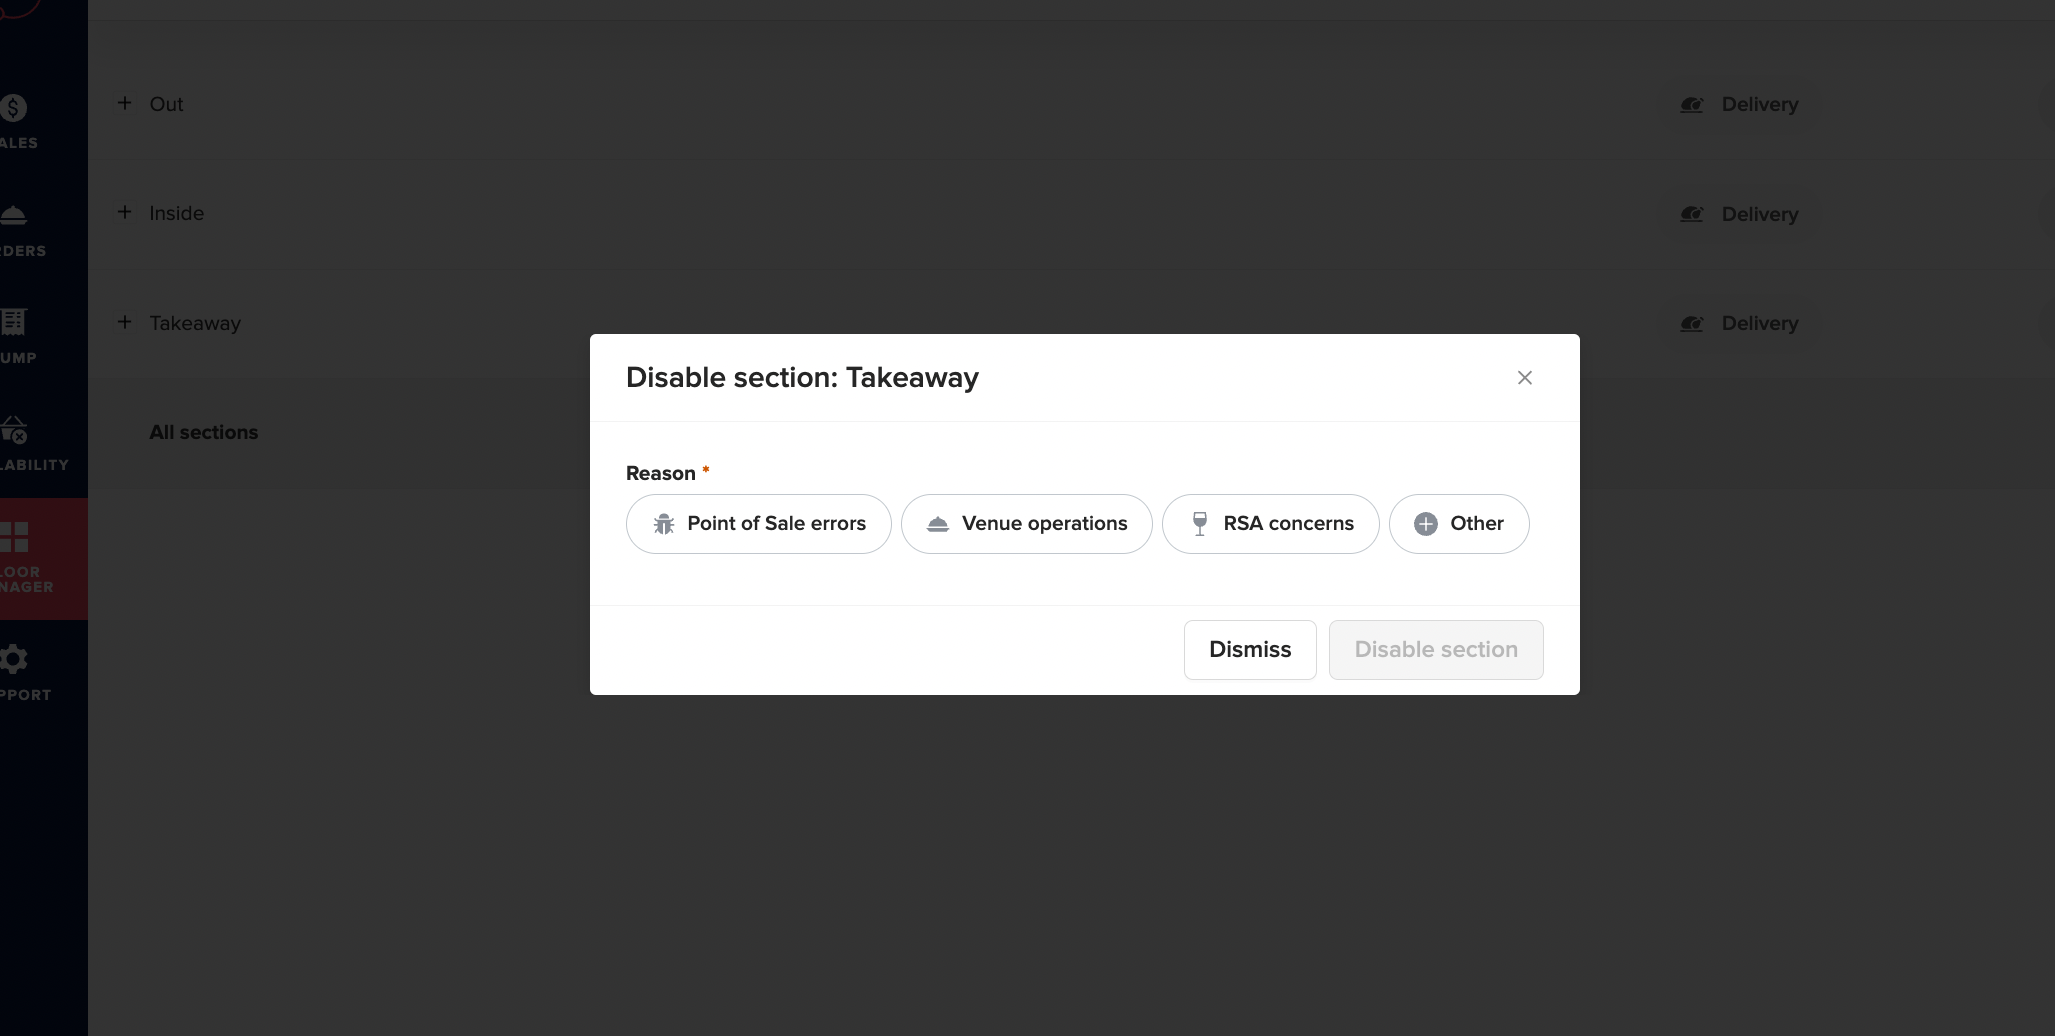
- Then choose how long you want to disable the section, or open live chat before disabling the section.
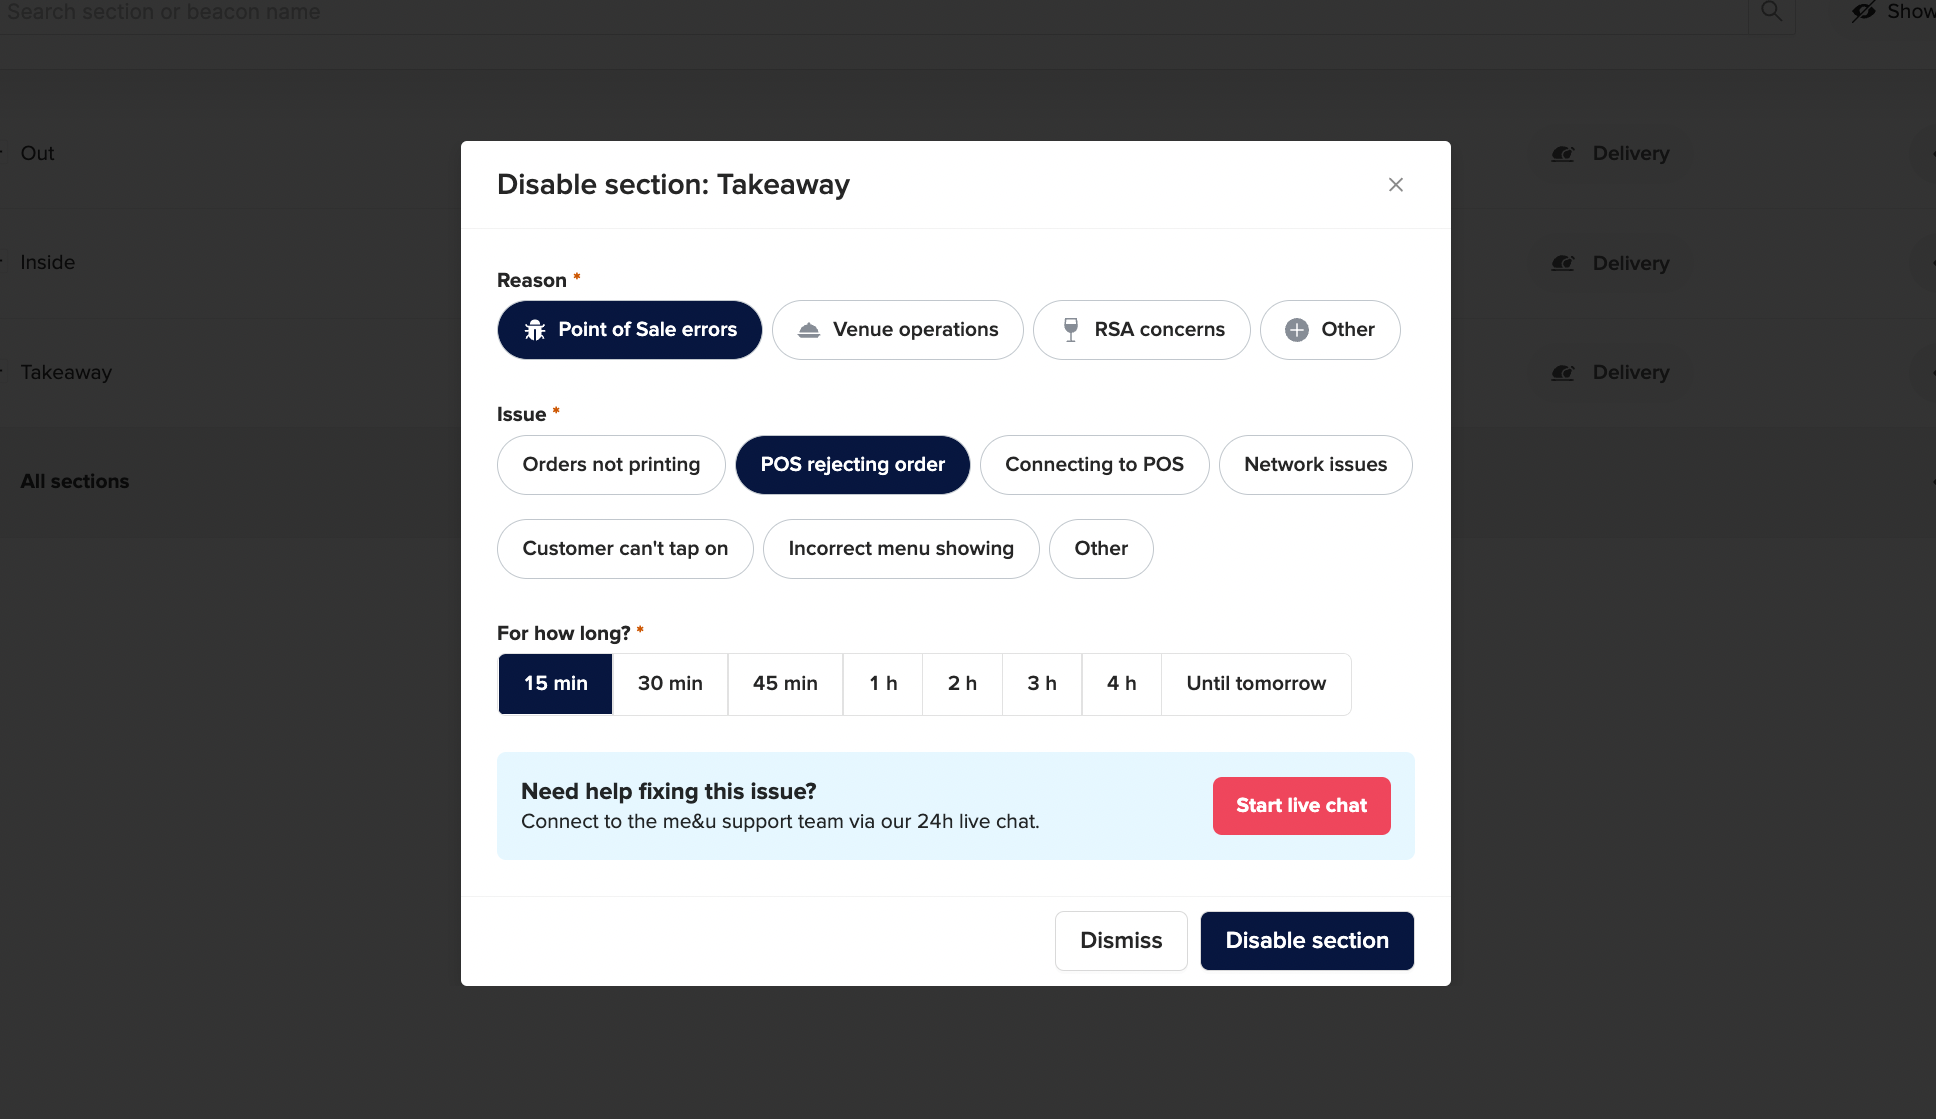
If you are disabling me&u due to an issue, give your Account Manager a call.
Alternatively, contact our Customer Experience team via the Live Chat function, or via:
📧 Email:
- Australia & NZ helpme@meandu.com.au
- United States helpme@meandu.com
- United Kingdom helpme@meandu.co.uk
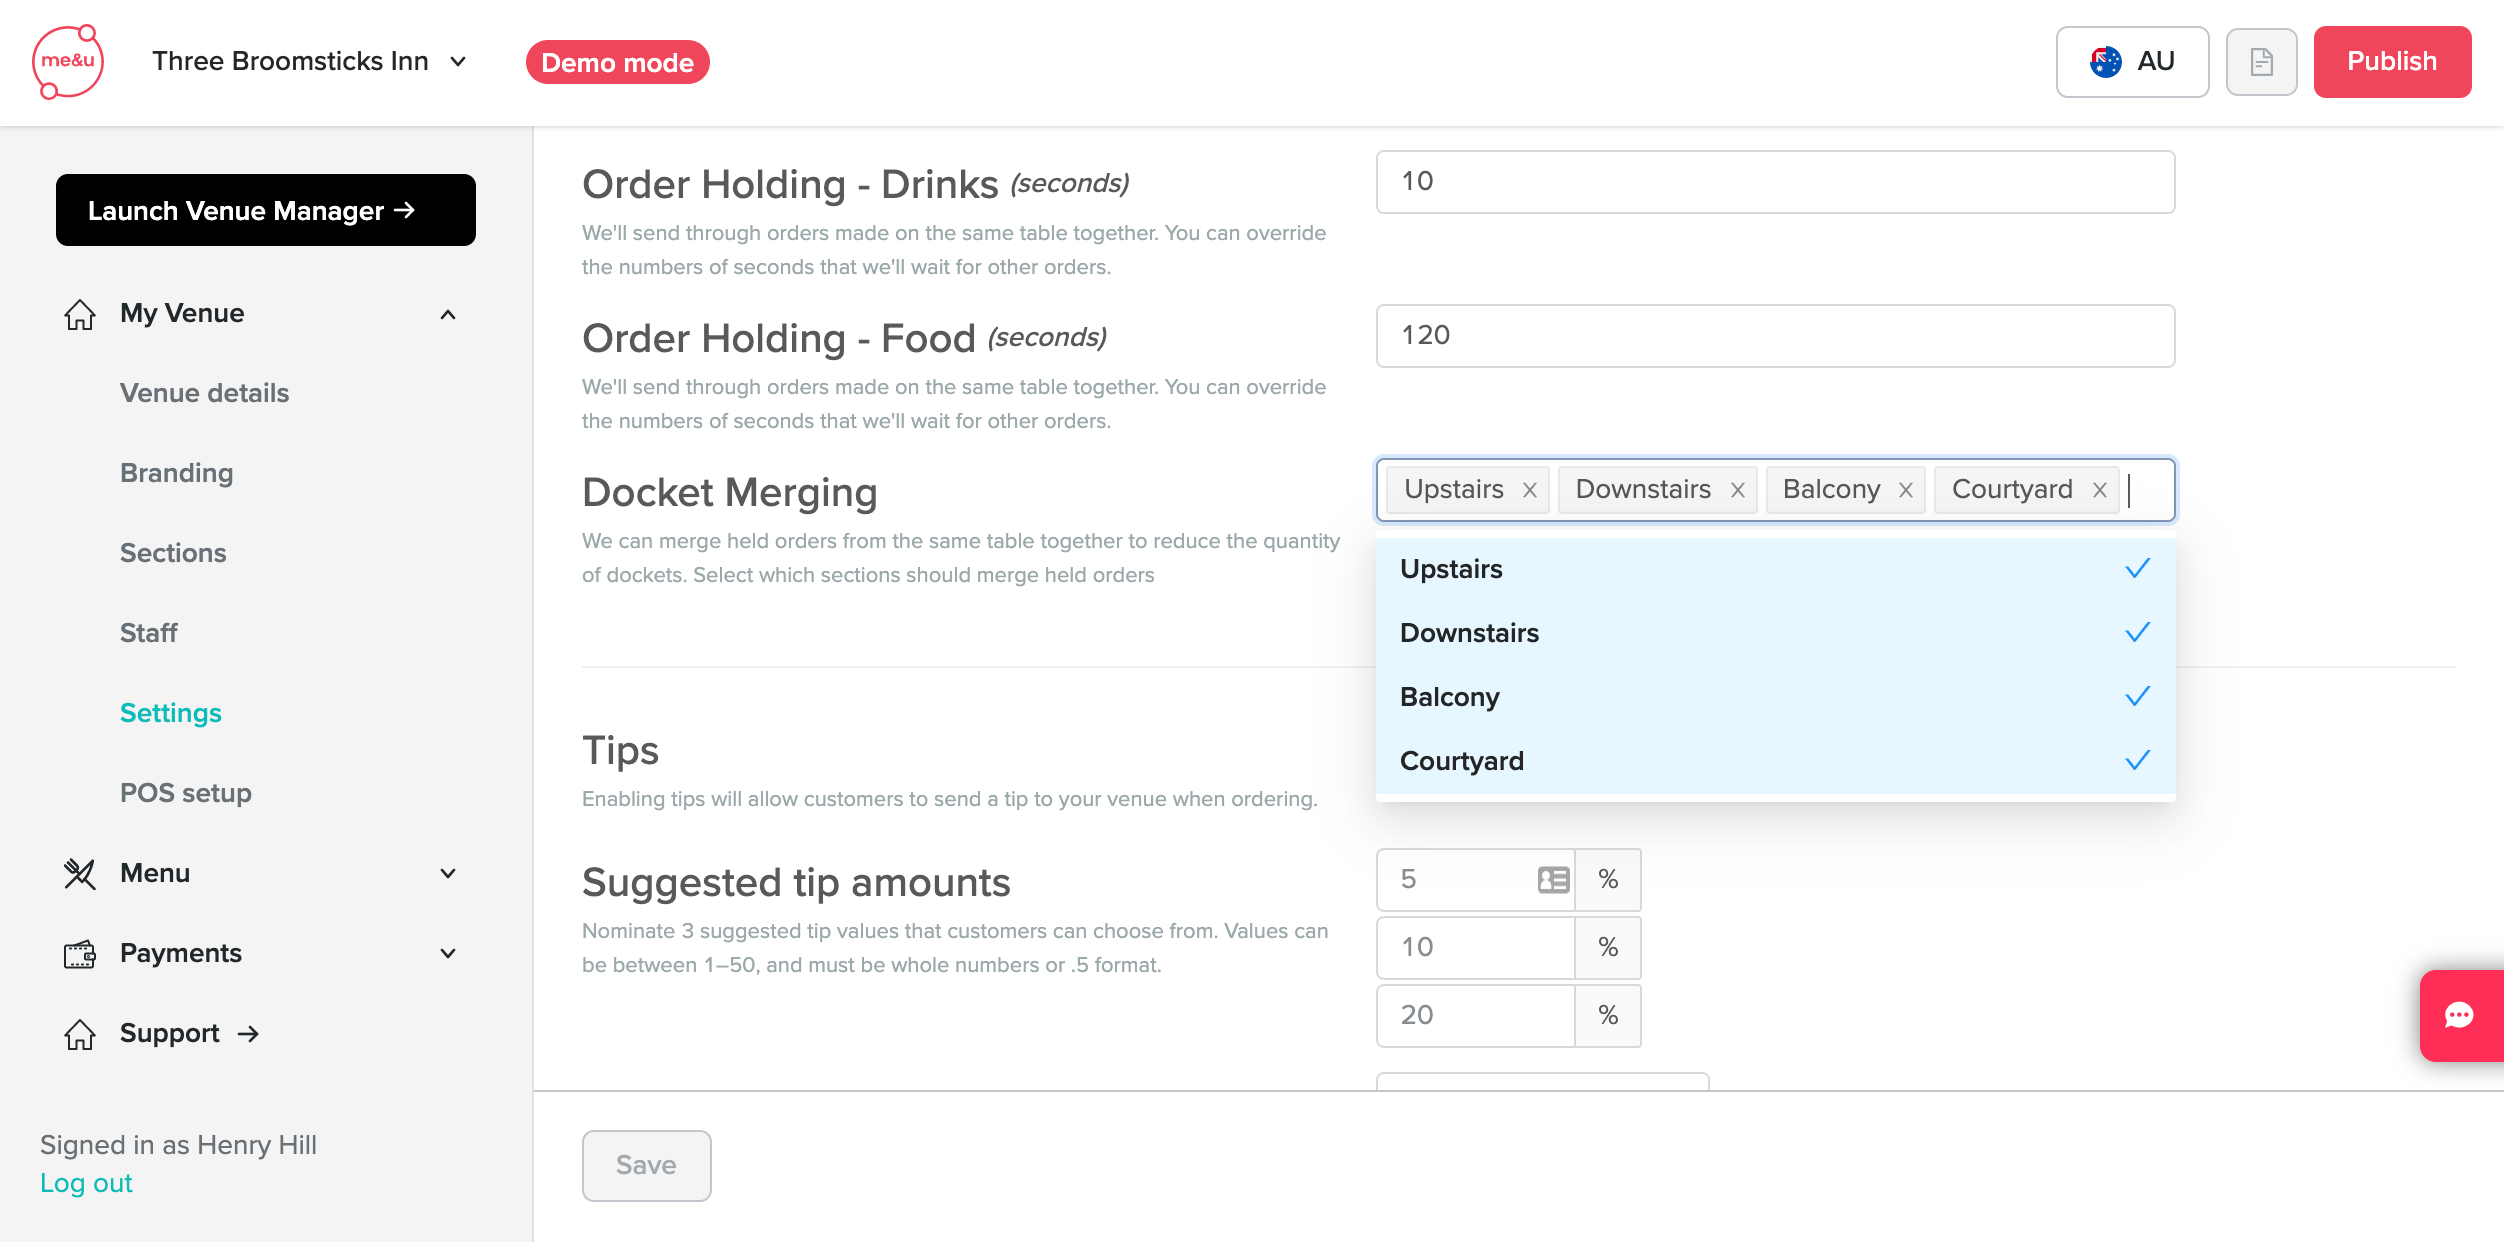
Order Holding & Docket Merging
What is Order Holding?
Order holding is a feature that will take an order from a customer and hold it for a specified period of time i.e. 60 seconds. During this time, the docket sits in ‘limbo’ so does not print yet.
me&u allows for order holding to be set differently for food and drinks, for example drinks might be sent to the printer after 10 seconds whilst food might be sent after 60 seconds.
This enhances the customer experience by allowing drinks to get to the table quicker while food may be held longer to ensure all meals arrive at the same time.
With order holding, orders will be batched and sent together so they print at the same time one after another. For information about how to merge batched orders on a single docket see Docket Merging.
What is Docket Merging?
Docket merging works with order holding by taking any orders batched together and sending them through to the POS as a single order and therefore a single docket.
How to enable Order Holding & Docket Merging?
To edit Order Holding for food and drinks, go to the settings page in the Operator Portal. Add the values you want orders to be held for food items and drink items in seconds. We recommend using a small value for drinks and higher for food. This will mean that customers will get their drinks earlier and likely to have a more positive experience.
If you don't have access to the settings page, please reach out to your manager that might have the correct level of permission to access this page. If you're still having trouble, please contact your Account Manager or Customer Experience team at helpme@meandu.com.au.
If you do not want to have different holding times for food and drinks then set the values to be the same.
.png)
To edit Docket Merging, go to the settings page in the Operator Portal. Add the sections you want dockets to be merged. You can choose that some sections merge and others do not. Please be aware if your venue uses membership you should not enable docket merging or the POS will not be able to attribute member rewards to customers.
Tipping
How does it work? When customers confirm their payment details, pop-up will prompt the customer to tip, like the example below.
.png)
Venues have the option of changing the default tip amounts to display to customers and whether one of them is preselected when the modal appears. Note the highest tip amount cannot be set to be preselected.
If the default tip amounts are not changed the defaults will be as follows:
- Australia & NZ: 5%, 10%, 20%
- UK: 5%, 12.5%, 20%
- USA: 18%, 20%, 22%
Customers will also have the option of specifying custom tipping amounts in local currency or as a percentage.
.png)
To enable or disable the tipping feature or to change the default tipping amounts open the Operator Portal then click on the My Venue dropdown and Settings.

If you don't have access to Settings, please reach out to your manager that might have the correct level of permission to access this page. If you're still having trouble, please contact your Account Manager or Customer Experience team at helpme@meandu.com.au.
3. Services, Categories & Sections
Services
Services allow you to display different categories at different times of the day.
For example: Breakfast, Lunch, Dinner & Late Night Drinks Only
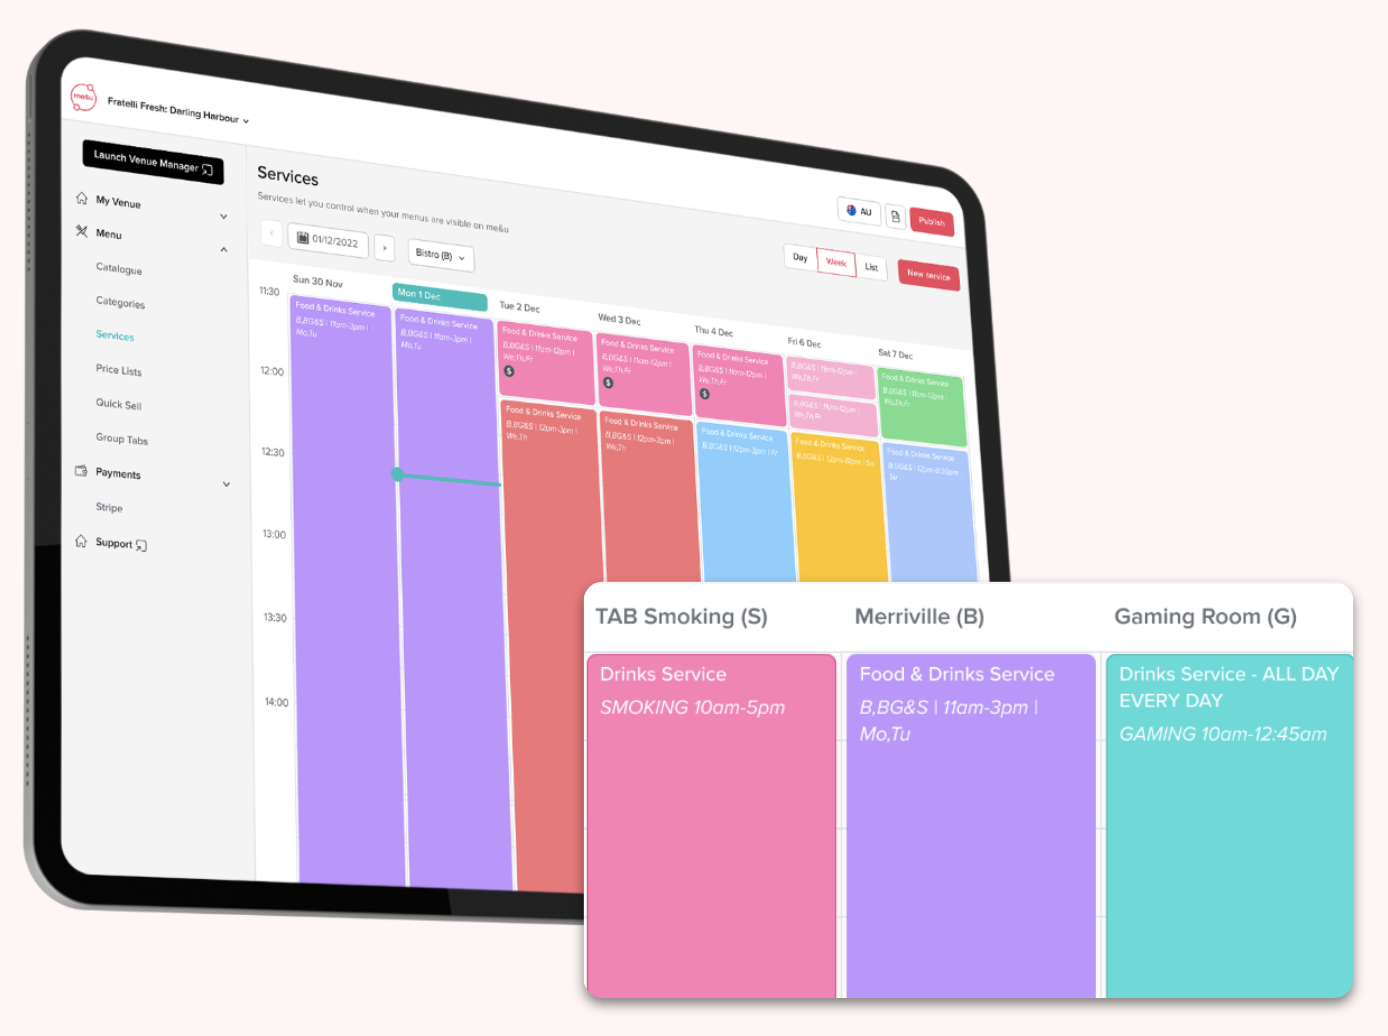
Service Visualiser
View services in a calendar, day or week view with colour-themed service blocks. Find out more about service visualiser here.
Delete
Categories
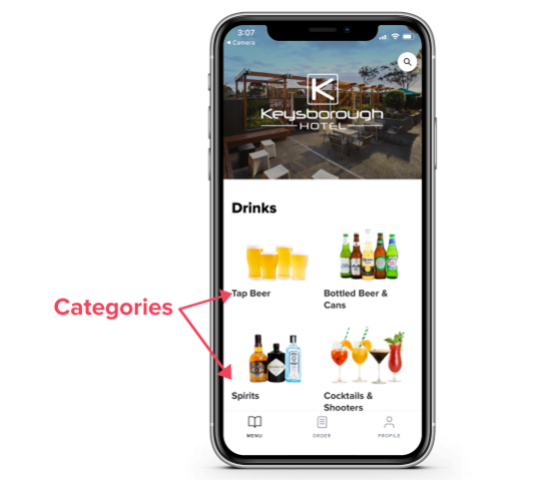
Categories are groupings of similar dishes or drinks that appear on your menu. For example, entrees, share-plates or dessert.
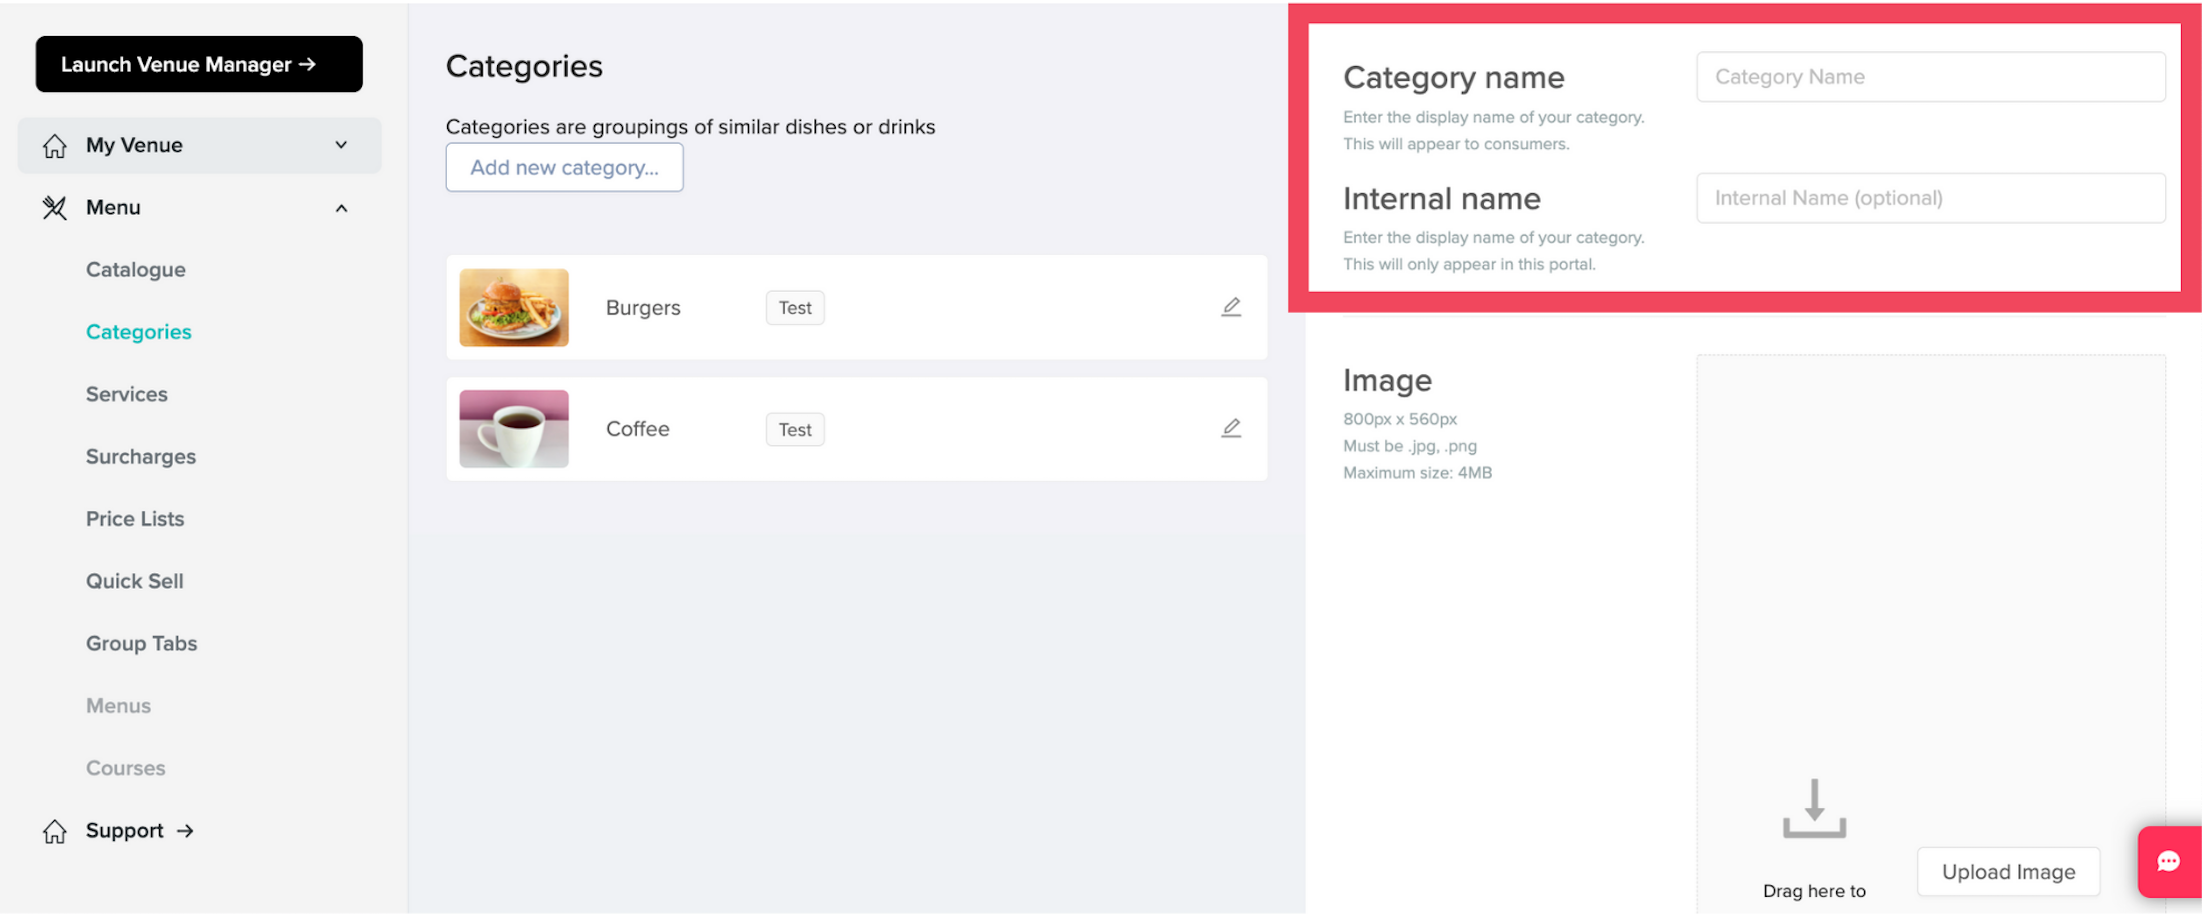
Under Menu, click Categories, then Add New Category.
Add Category name, and optionally an Internal name. Internal names are not visible to customers, and are only visible on Operator Portal. They can be useful to differentiate specials and promotions or sections specific categories.
Add an image for the category. These must be 800px x 560px - see this article on how to take quality photos for you me&u menu.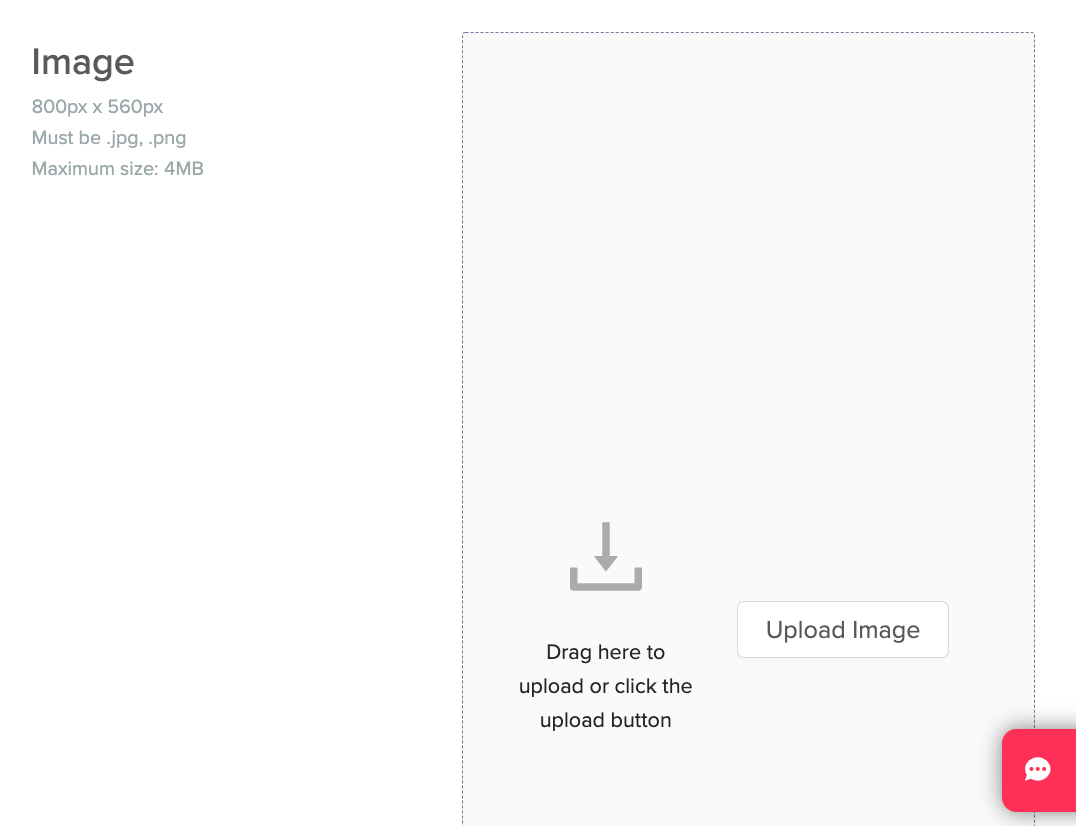
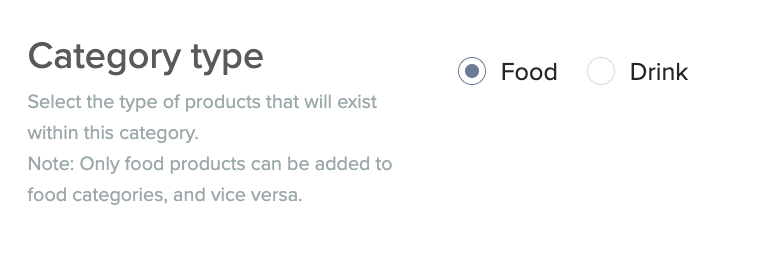
Select the Category Type, either food or drink. Only food products can be added to food categories, and vice versa.
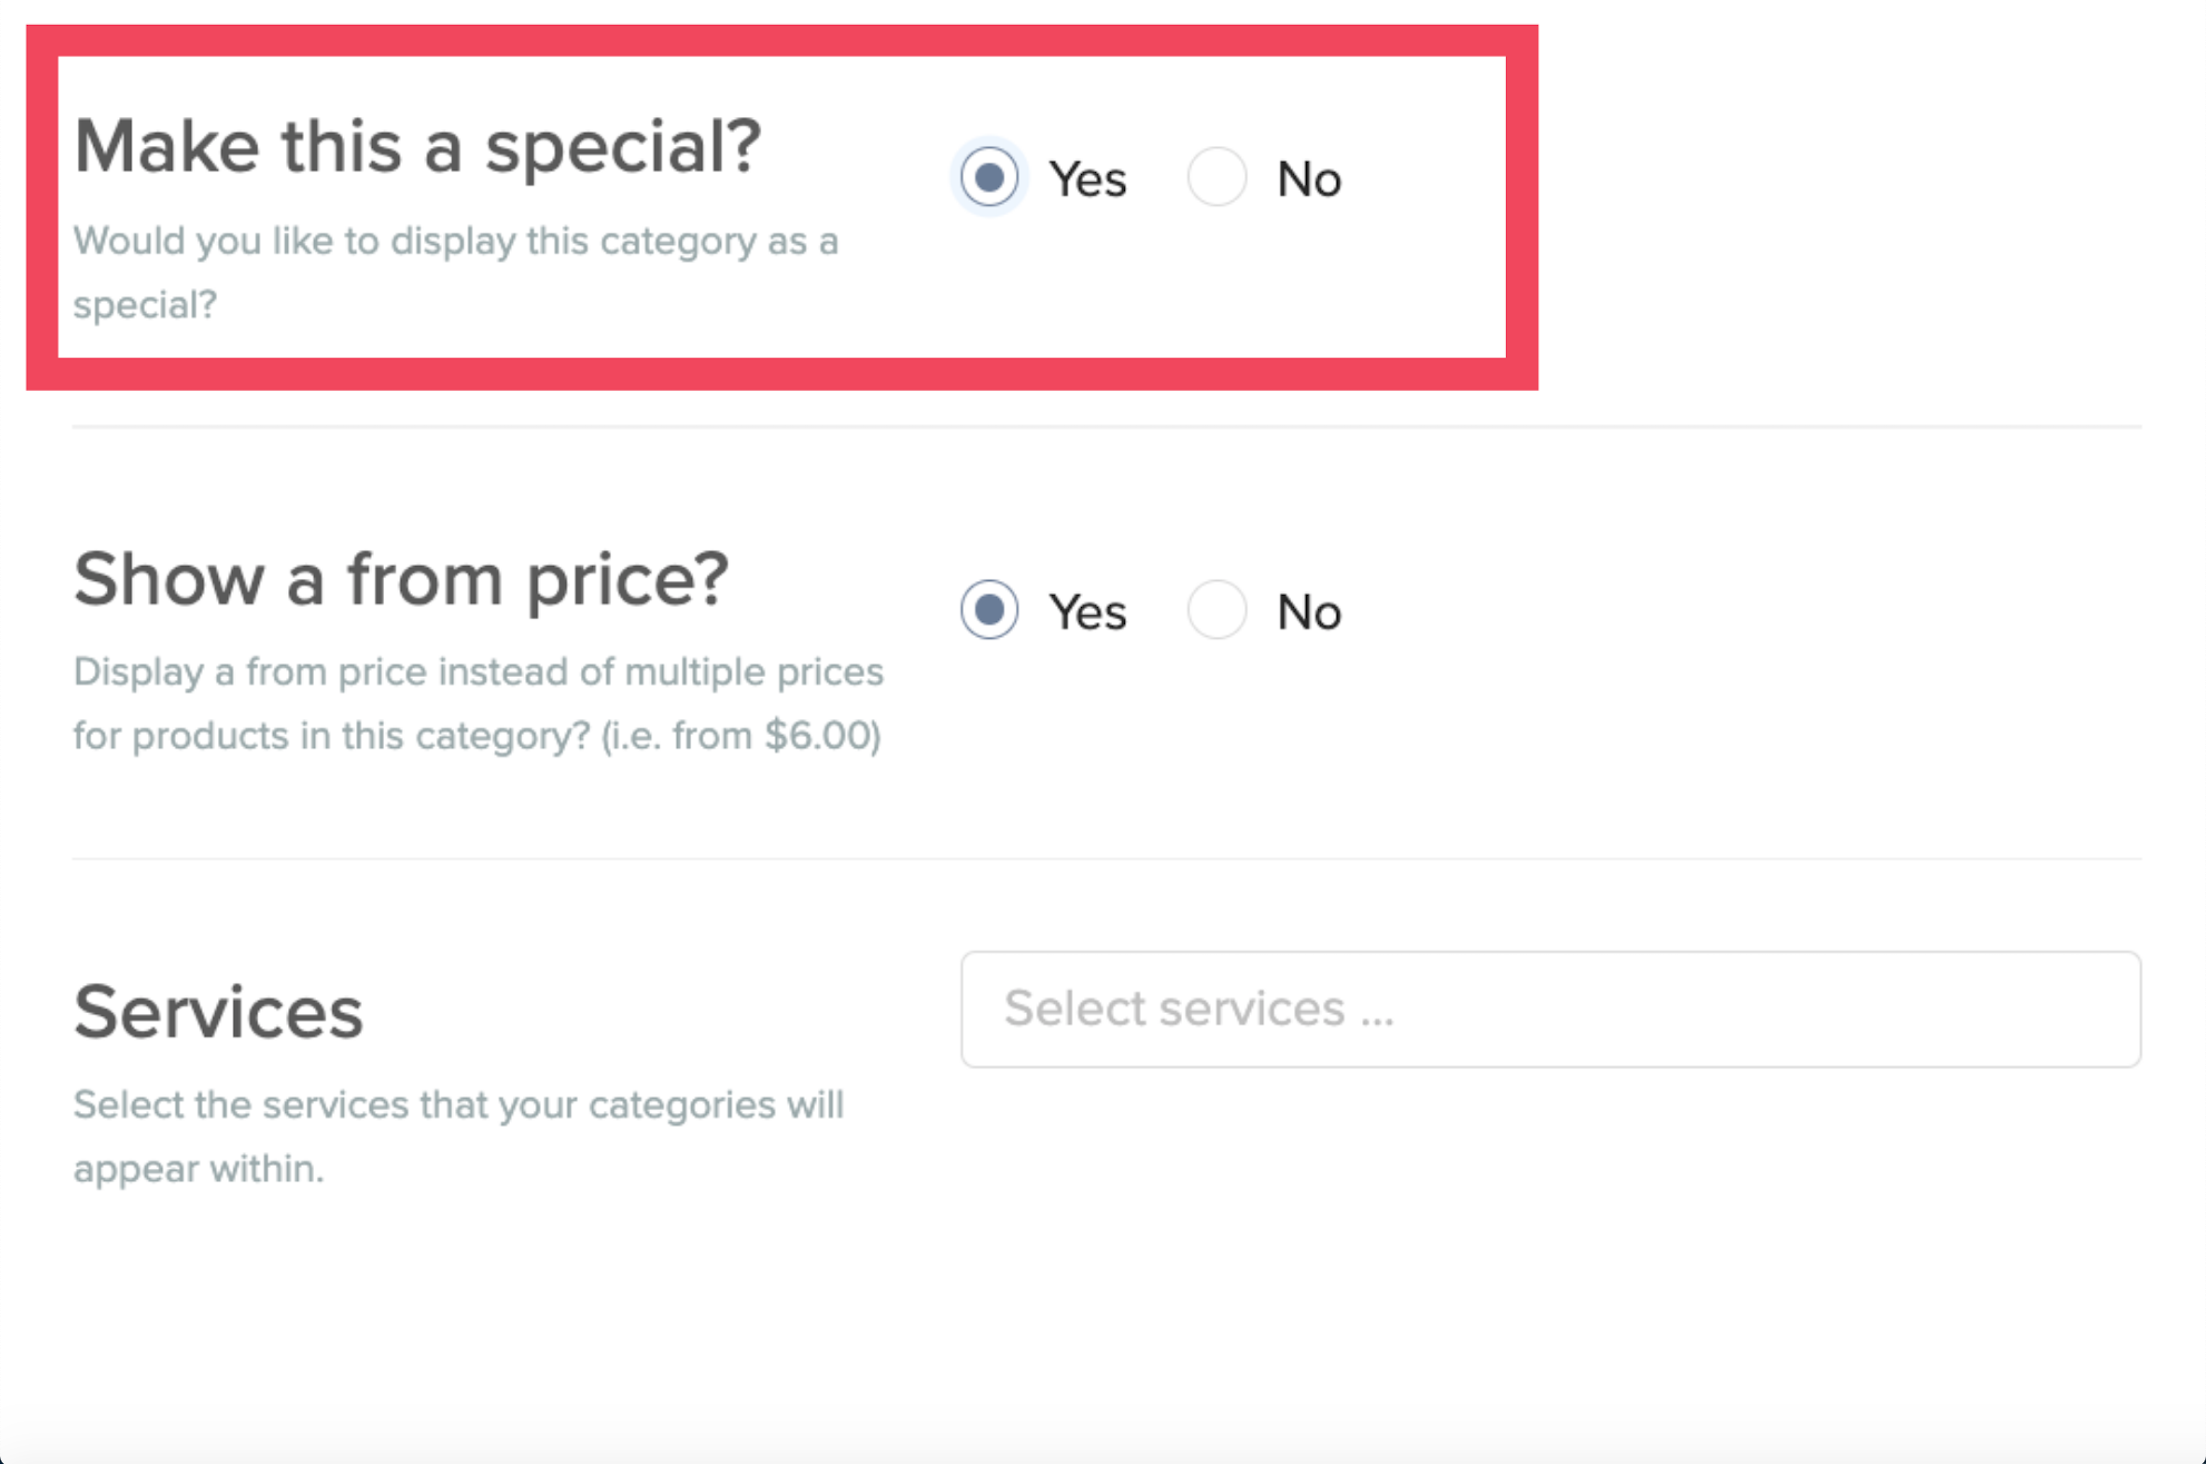
Select if the category is a “Special”. Special categories are prioritised to the top of the menu in all services they are in and have a tag next to their name.
.png)
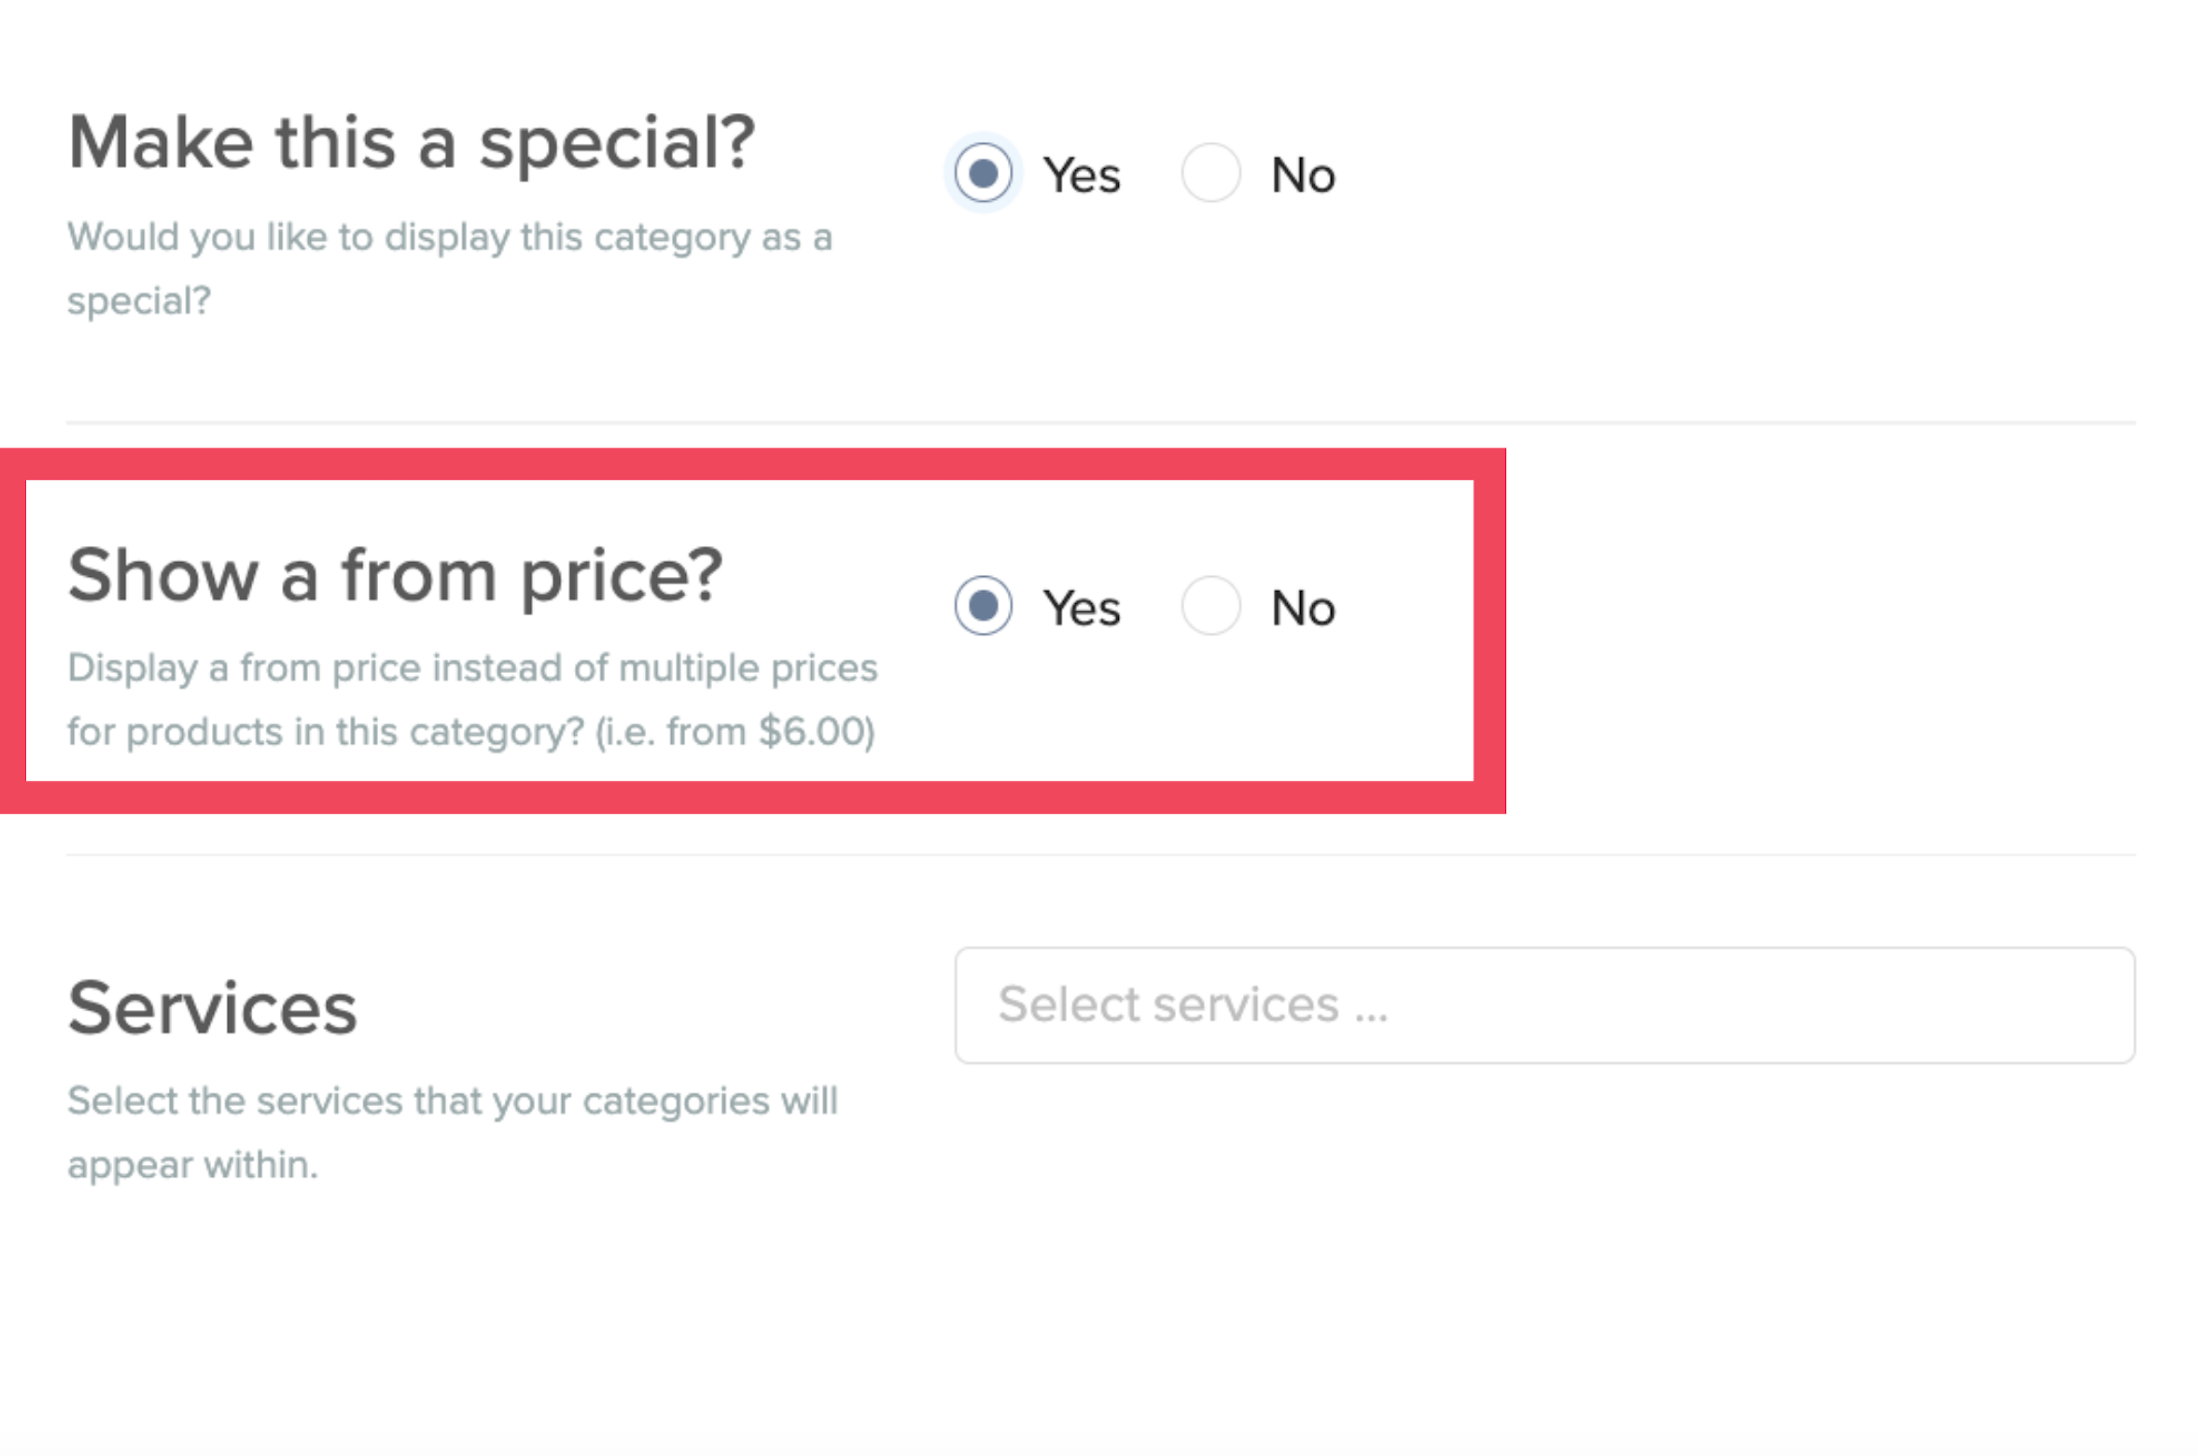
Choose if you would like all products in the category to Show a from price?. If yes is selected, products with price variants within this category will show "From $XYZ" instead of the first initial of the price variant followed by the price for each price variant.
.png)
Select the services that your categories will appear within. For more information on setting up services, see this article.
Add the Products that you wish to be included in this category. Search for the display name or internal name in the left box, and tick the products. Then use the ">" button to move them across to the right box.

The order that the products are in within a Category is dictated by their position within the list products in the right box. Click and drag the products so that they display a logical flow for your customer.
Once you are happy, click "Save"
Sections
Setting up and editing new Sections
Sections need to be created by the me&u team. Once created, owners and managers are able to edit them.
- Australia & NZ helpme@meandu.com.au
- United States helpme@meandu.com
- United Kingdom helpme@meandu.co.uk
4. Finance
Payments (AU & US)
The daily venue payment process: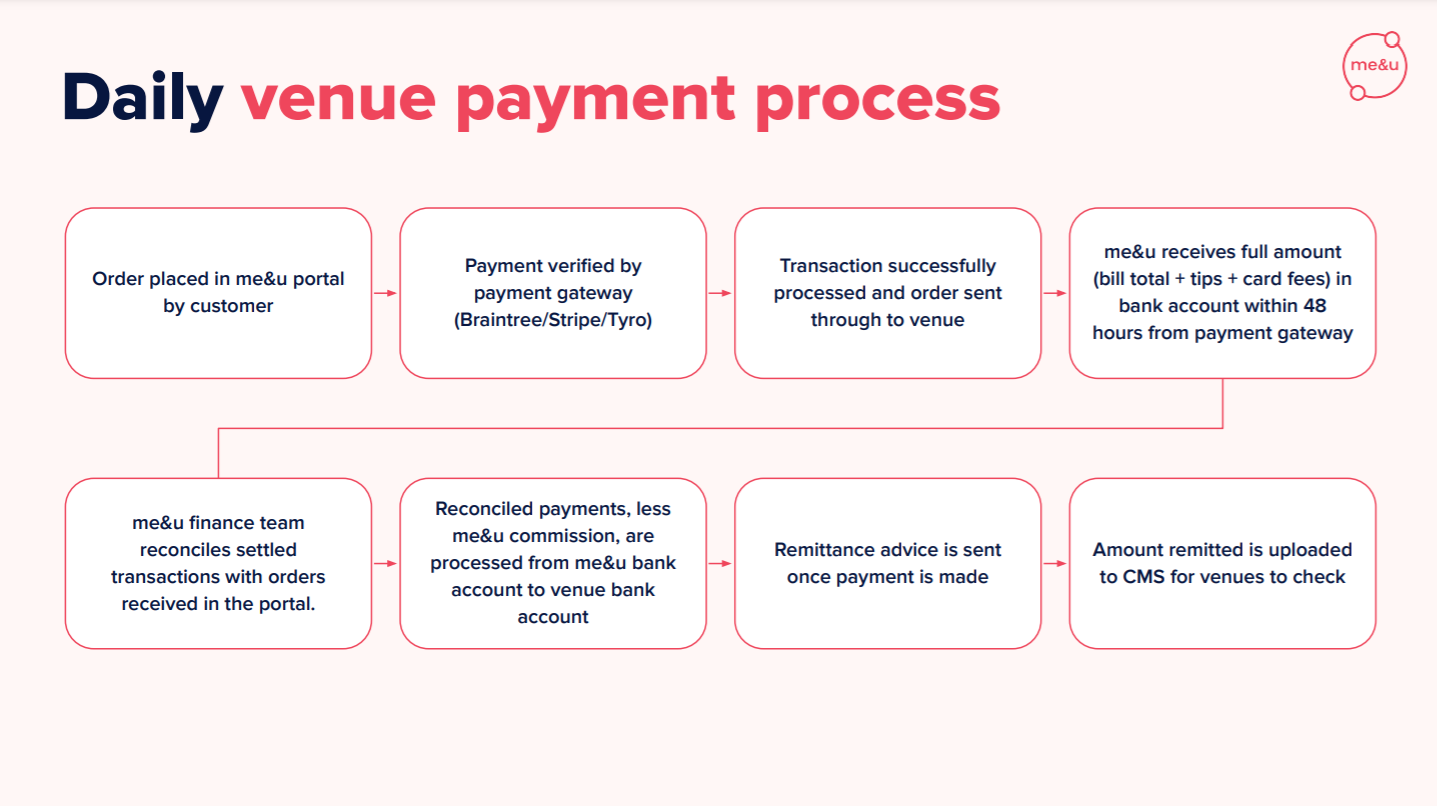
The weekly venue payment process: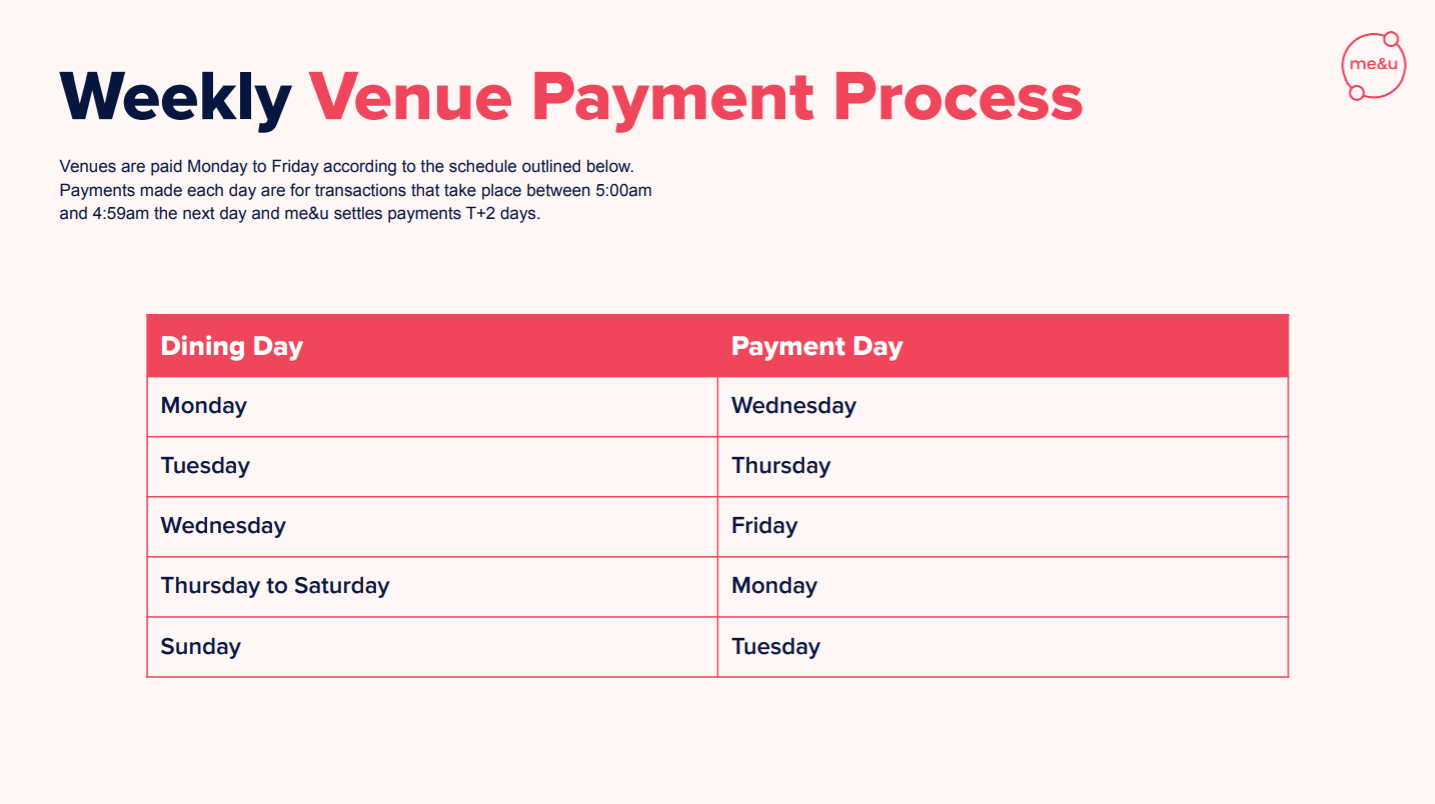
Click here to find out more.
Payments (UK)
Weekly venue payment flow
Venue payouts are processed as shown in the table below. All payouts will arrive in the venue’s Stripe account and from there can be withdrawn into venue’s selected bank account. Dining days run from 5:00am to 4:59am (all times are AEST).
Dining Day |
Estimated Settlement to Venue Bank Account |
Monday |
Tuesday |
Tuesday |
Wednesday |
Wednesday |
Thursday |
Thursday |
Friday |
Friday |
Monday |
Saturday |
Tuesday |
Sunday |
Tuesday |
Please note: If there is a public holiday payments will be made on the next business day.
If you have any further questions about reconciliation please reach out to finance@meandu.com.au
Delete
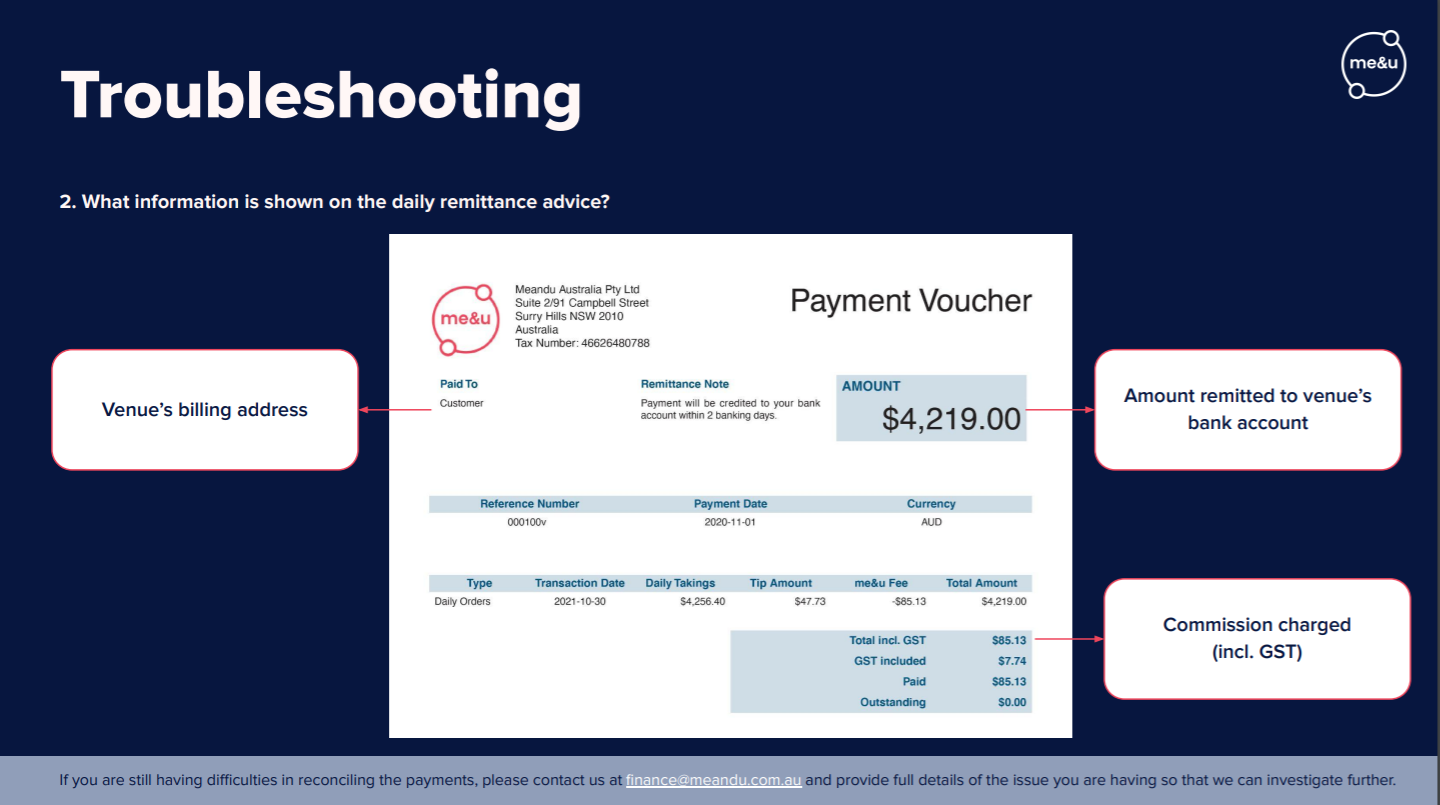
Remittance & Reporting
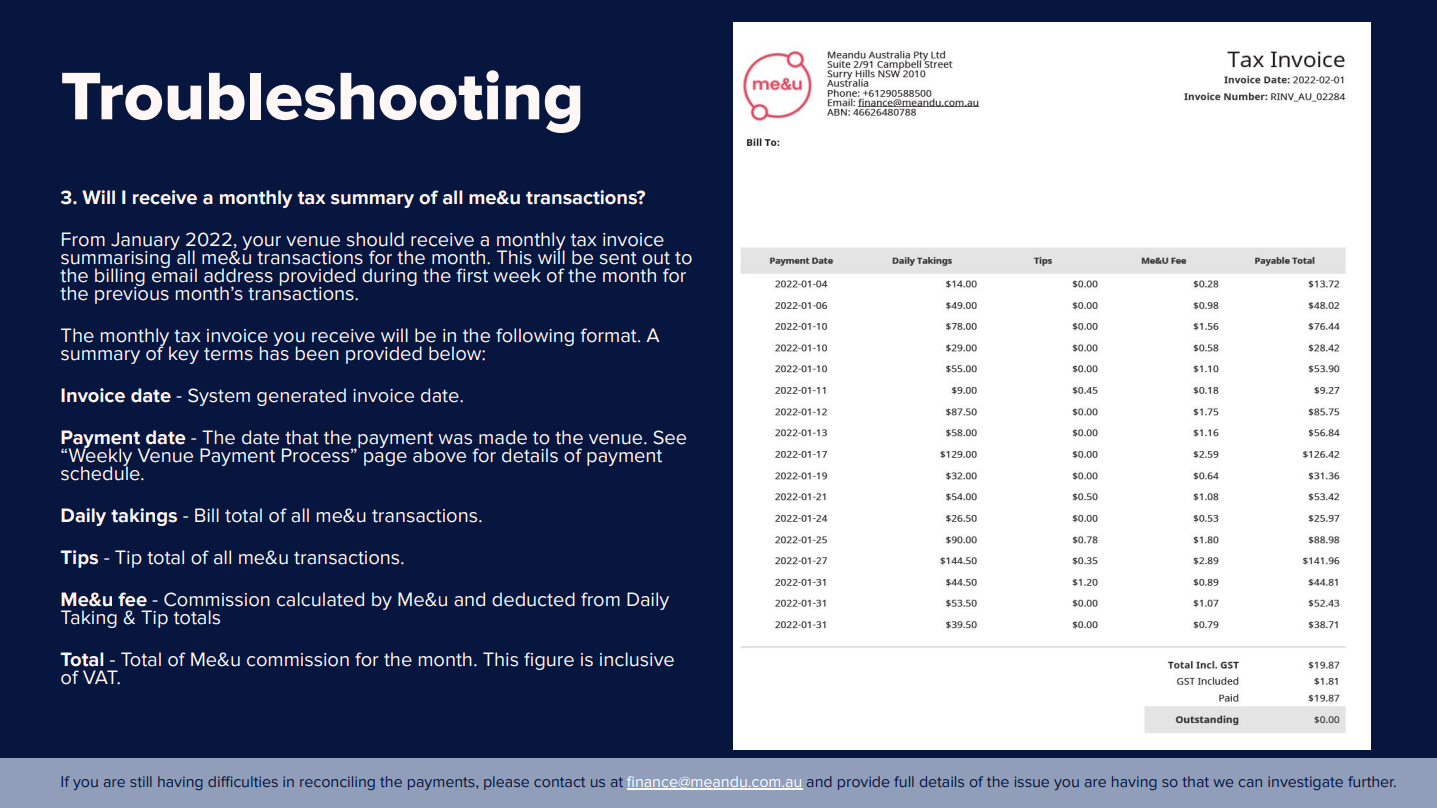
Invoices with the total me&u fee and GST are sent monthly via email.
Remittance Advice is sent daily via email, as well as Daily Sales/Remittance are shown in the Operator Portal portal under ‘Payments’.
Transaction Report
The last 30 days of transactions can be found and exported to a CSV file in the Venue Manager.
- Login to the me&u Operator Portal and launch Venue Manager.
- On the Sales tab you can export taking for any of the past 30 days by changing the day at the top of the page.

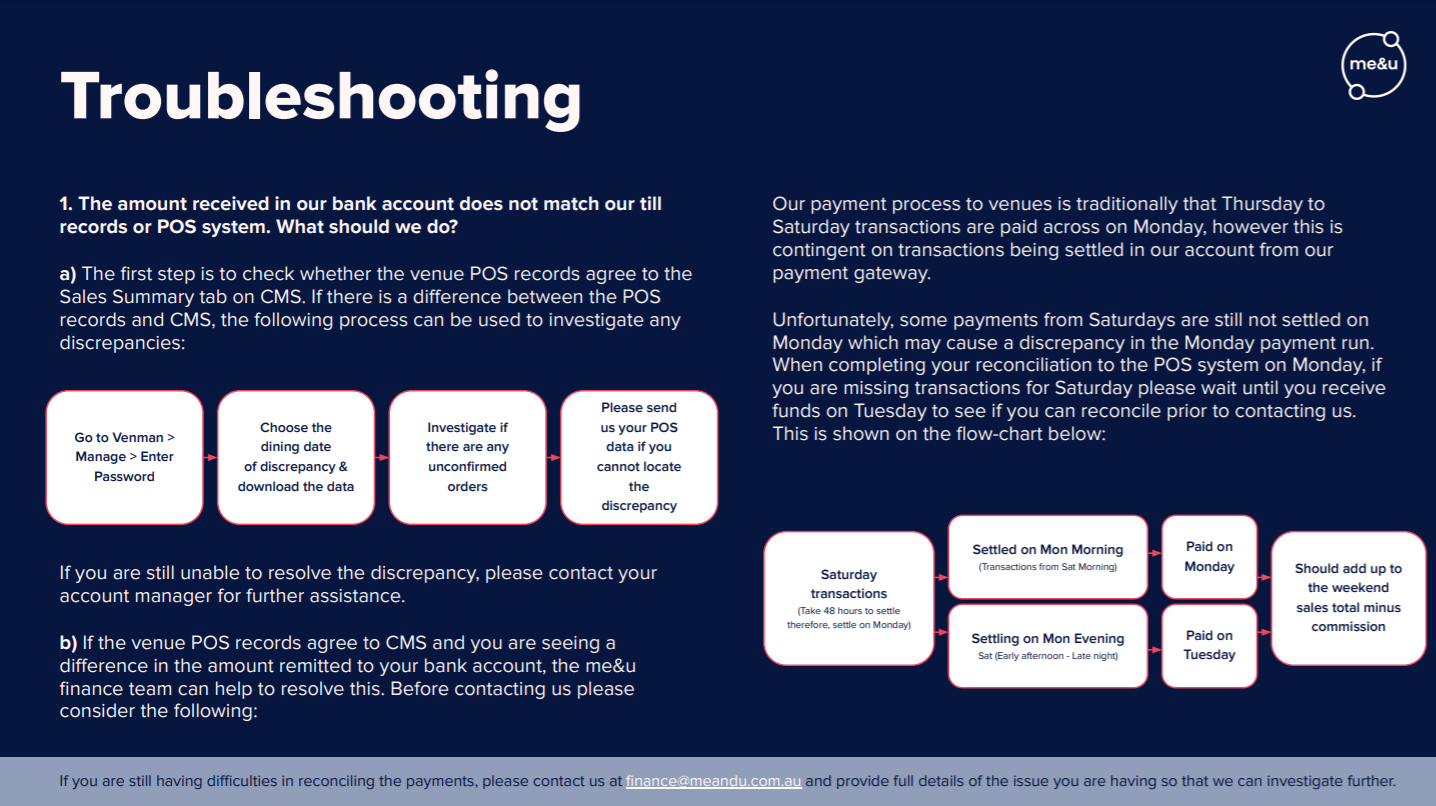
Reconciliation
Having trouble Reconciling?
Check Live Orders for unconfirmed orders.
What is an unconfirmed order?
An unconfirmed order means that a customer has been charged by me&u however the order was not confirmed by the point of sales system. Therefore it will not appear on the point of sales system reporting and can cause discrepancies in remittance. Unconfirmed orders are generally caused by internet issues or outages.
1. To access live orders go to Operator Portal and launch Venue Manager and click Orders.

2. Click on Orders in the right hand corner
3. Select the relevant date, click the filter icon on Status and select "unconfirmed"

This may explain the discrepancy between me&u payment and point of sales system reporting.
If you have any further questions about reconciliation please reach out to your account manager or finance@meandu.com.au
5. Syncing Products and Modifiers
Overview
me&u supports the ability for you to import products & modifiers from your POS into me&u. Click tab to right for more details!Note: this feature is only compatible with Kounta and Tevalis at the moment
DeleteHow to use POS Catalogue Sync
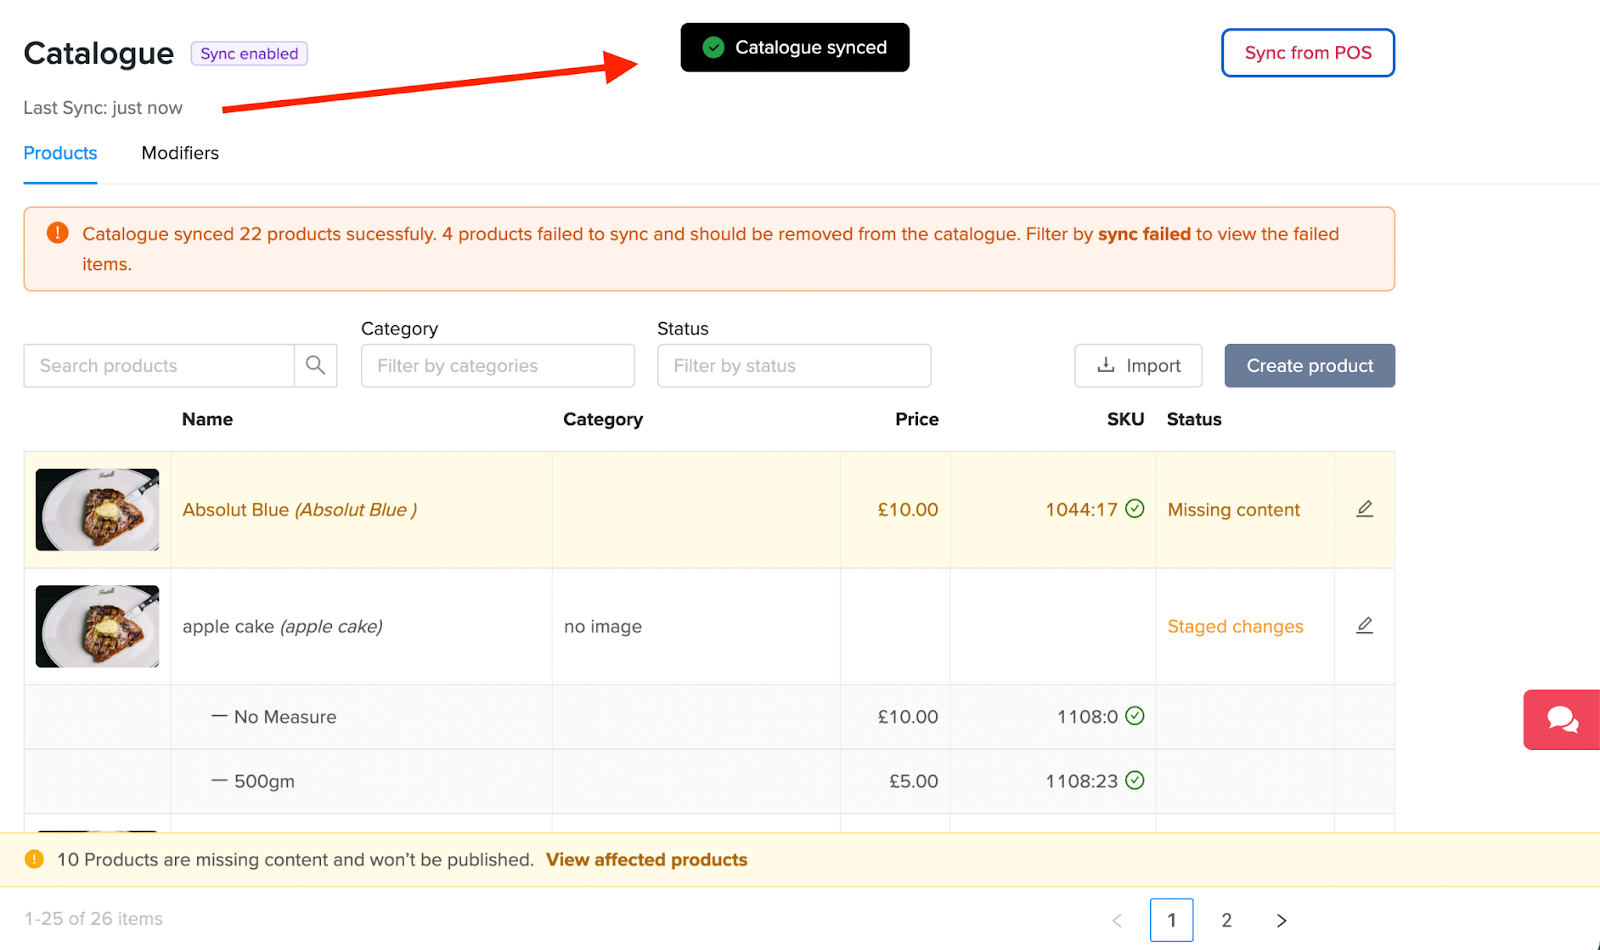
POS Catalogue allows venues/users to remain in sync with their POS system so they don’t need to maintain their products in multiple systems. An additional feature is having sync status’s within SKU column to clearly indicate which POS items are valid, invalid or validation required
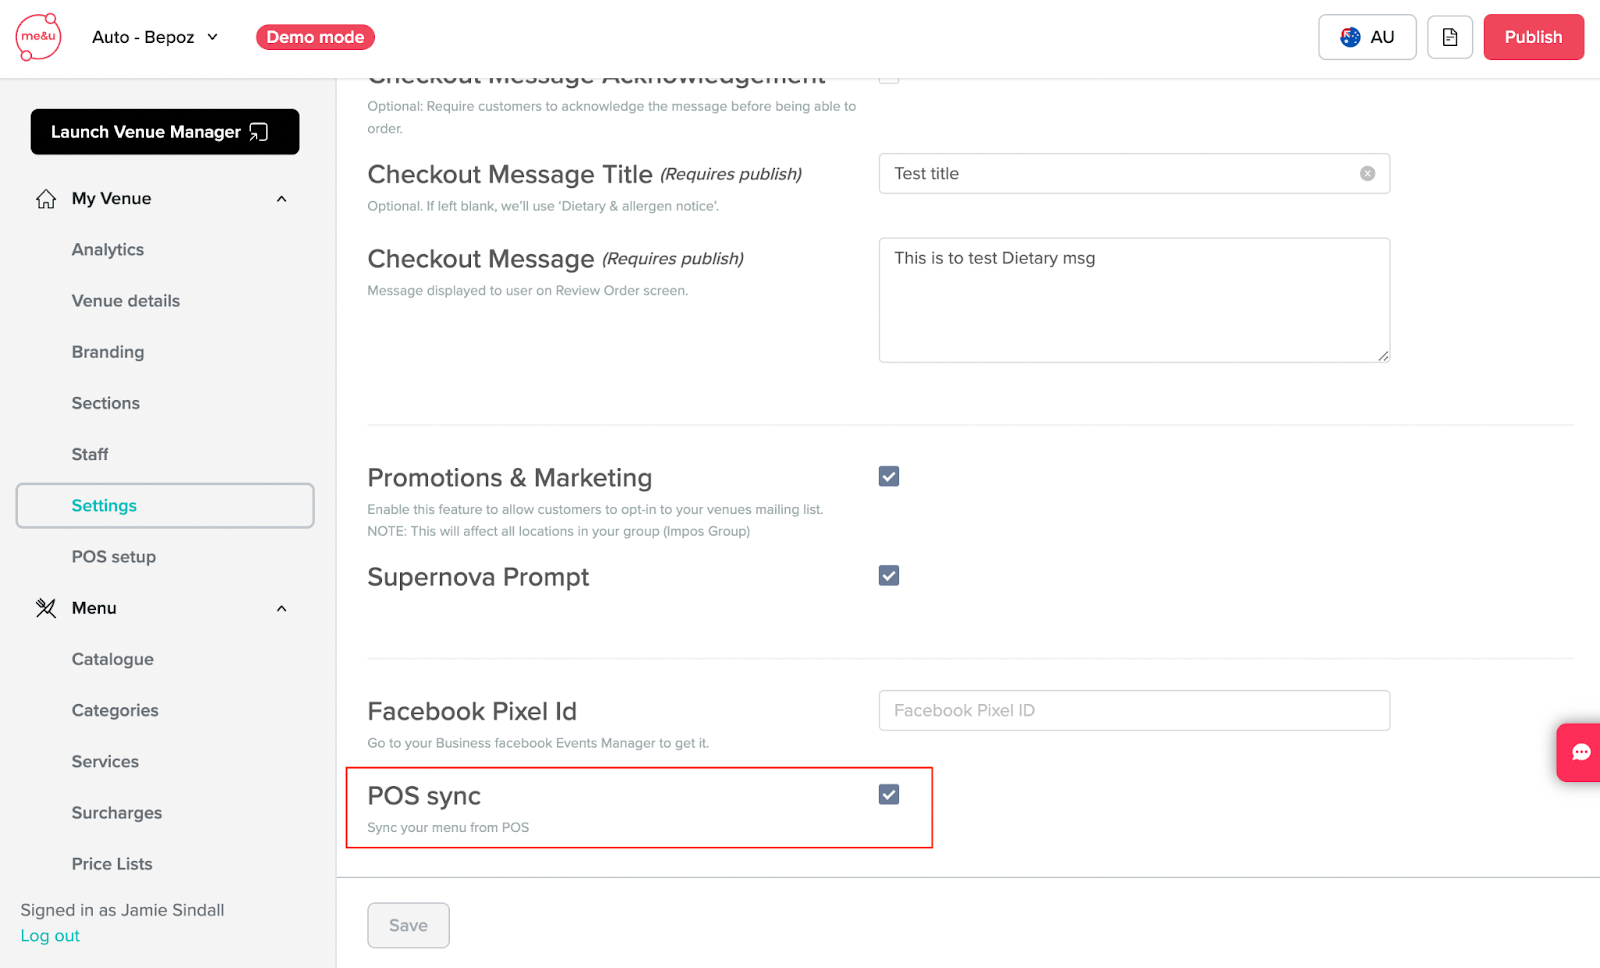
How to enable POS Catalogue?
- POS import functionality will already be available via the initial POS Integration
- Navigate to the side menu My venue > Settings > POS Sync and tick the box to enable POS sync for your venue
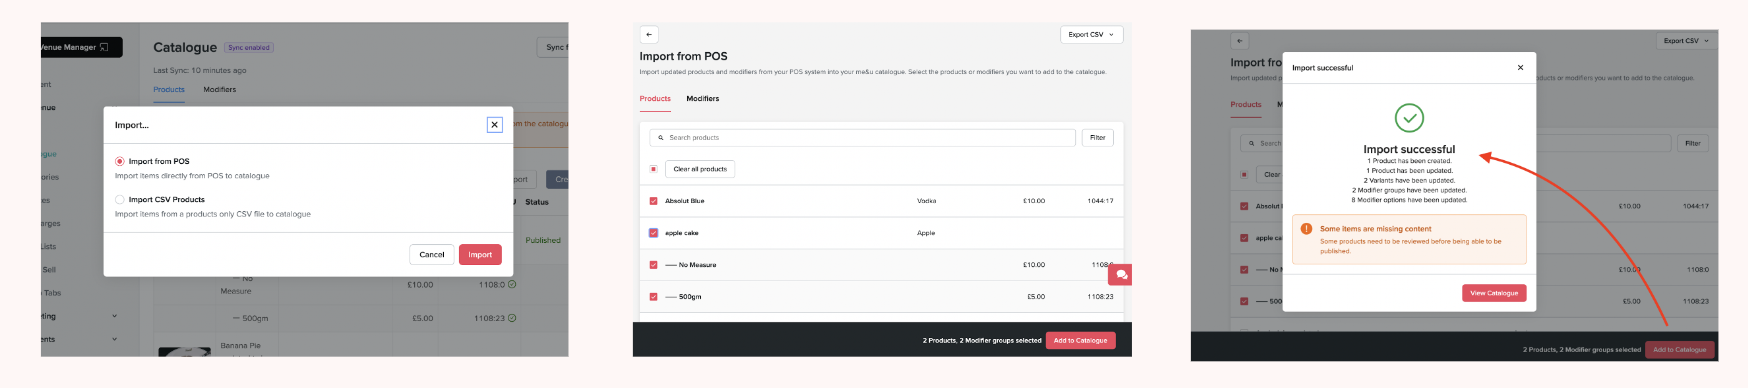
How to import Product & Modifiers from POS?
- Click on Menu > Catalogue > Import
- Click the first option: Import from POS > Import
- To view the imported products toggle between the Products & Modifiers tab
Search & Select Functions
-
Search - Users have the ability to search Products on a Product Level utilising the search box which will display results in real-time.
You can also search on a Category level utilising the filter tool on the right hand side which will display a dropdown of available categories from the POS - Selecting - Users also have the ability to select the individual products to import and also a select all tool which will select all products on that page (not all pages). Increasing the amount of products shown (pagination tool) will allow for a larger quantity of products selected in bulk.
Reviewing imported products
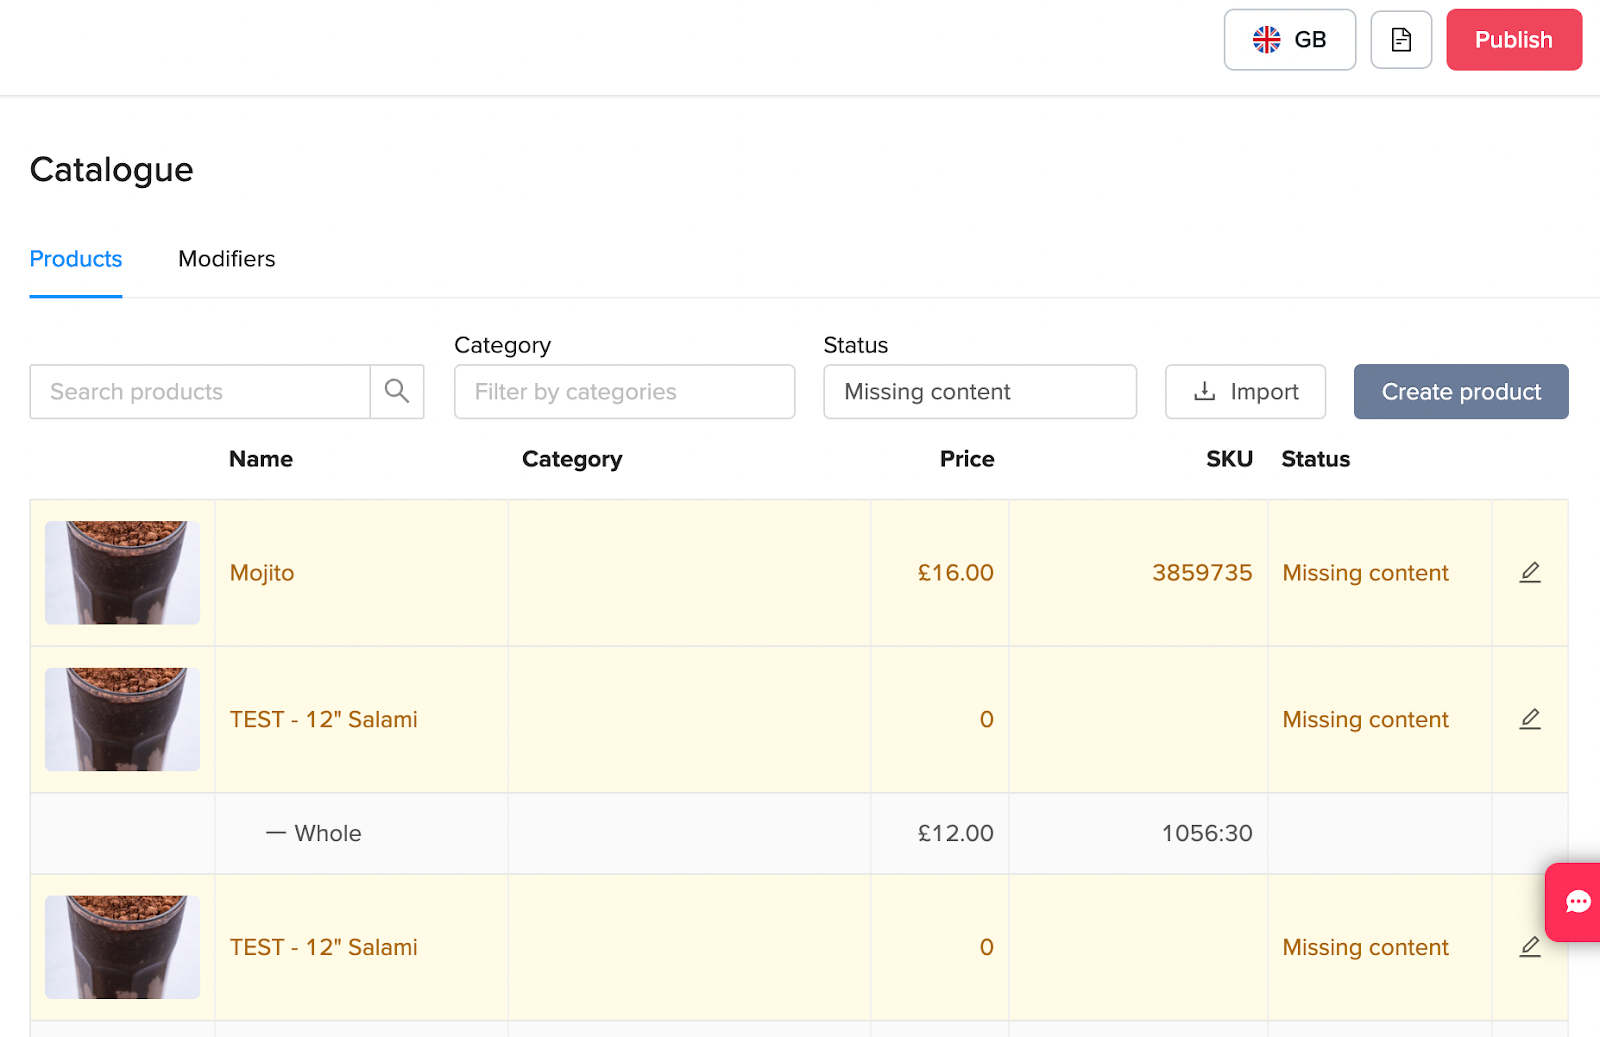
- If items are successfully imported, they will appear at the top of the catalogue and any missing content (images,Name, Categories and prices etc) will be flagged at the top.
- If there is an item in the catalogue with the same SKU then the import will fail. To work around this, you should delete the current version of the product you are wanting to update and import the new version from the POS.
Syncing from POS
-
Review products
Hit 'Sync from POS' button to begin syncing from the POS. Once complete, a popup toaster notification will confirm if the sync was successful or not. Another notification box will appear at the bottom if any products are missing content and won't be published.
Note: all products will need to be manually added to a category once imported. All products will also need imagery added. If an image is not added then your venue logo will appear as a placeholder in the meantime.

2. POS Validation + Status
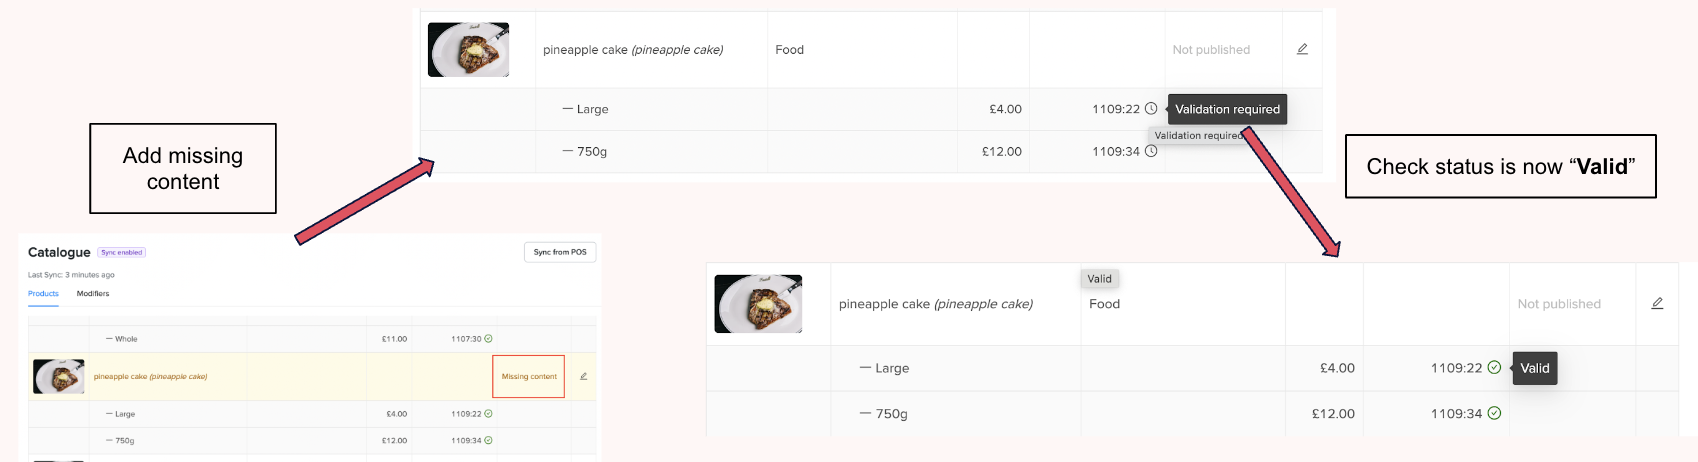
If SKU is showing as invalid then users should check the SKU data in the POS for SKU miss-matching. Otherwise the Product/modifier in the POS may not have a category assigned to it. Add the correct category in POS and re-sync to ensure SKU status is Valid
Publishing
- Review products - Once products have had their images, categories etc added once saved, users will see that the status of a product will turn to Validation Required, this is the cue to re-sync the products to return the SKU status back to Valid.
- Publishing - If SKU is showing as invalid then users should check the SKU data in the POS for SKU miss-matching or this may mean the Product/Modifier in the POS may not have a category assigned to it. Add the correct category in POS and re-sync to ensure SKU status is Valid before publishing.
Delete